Posted on

How to Make a Dining Table with an Oak Veneer Top and Steel Box Section Legs

A dining table is one of the most used and loved pieces of furniture in any home. It’s where meals are shared, work is done, and conversations happen. Building your own dining table gives you the opportunity to choose materials that fit your style and budget while creating something unique. One practical and stylish option is to pair an oak veneer top with steel box section legs. This combination gives you the look of natural oak with the strength and stability of steel, creating a table that feels modern, functional, and elegant.

The Style of the Table and Where It Belongs

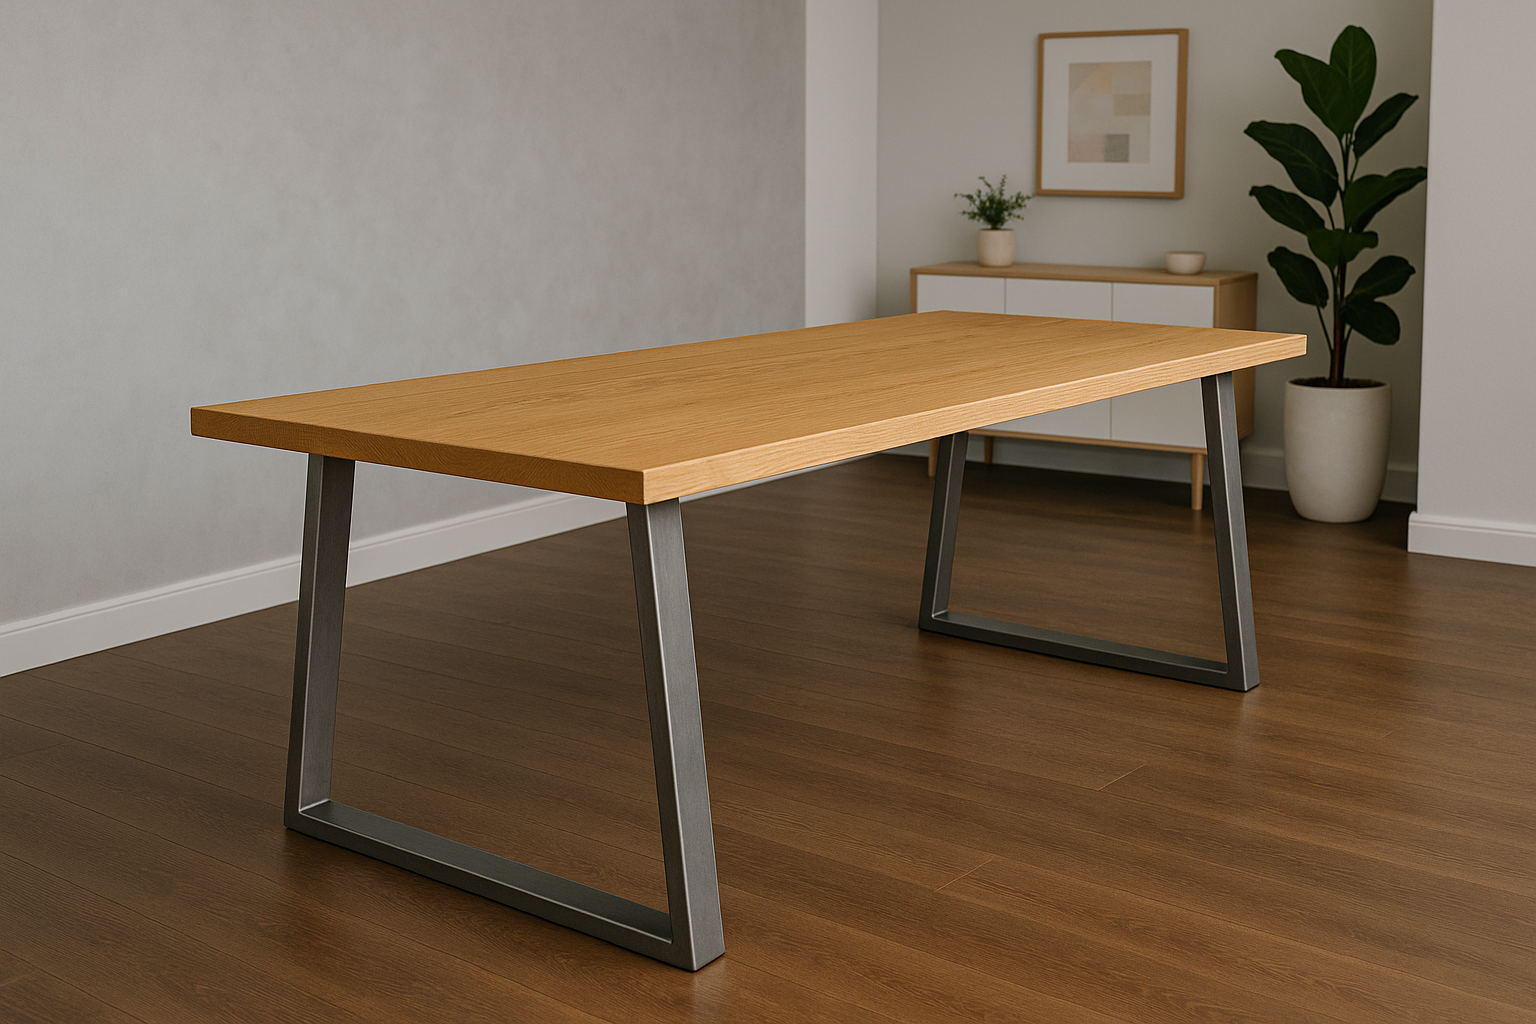
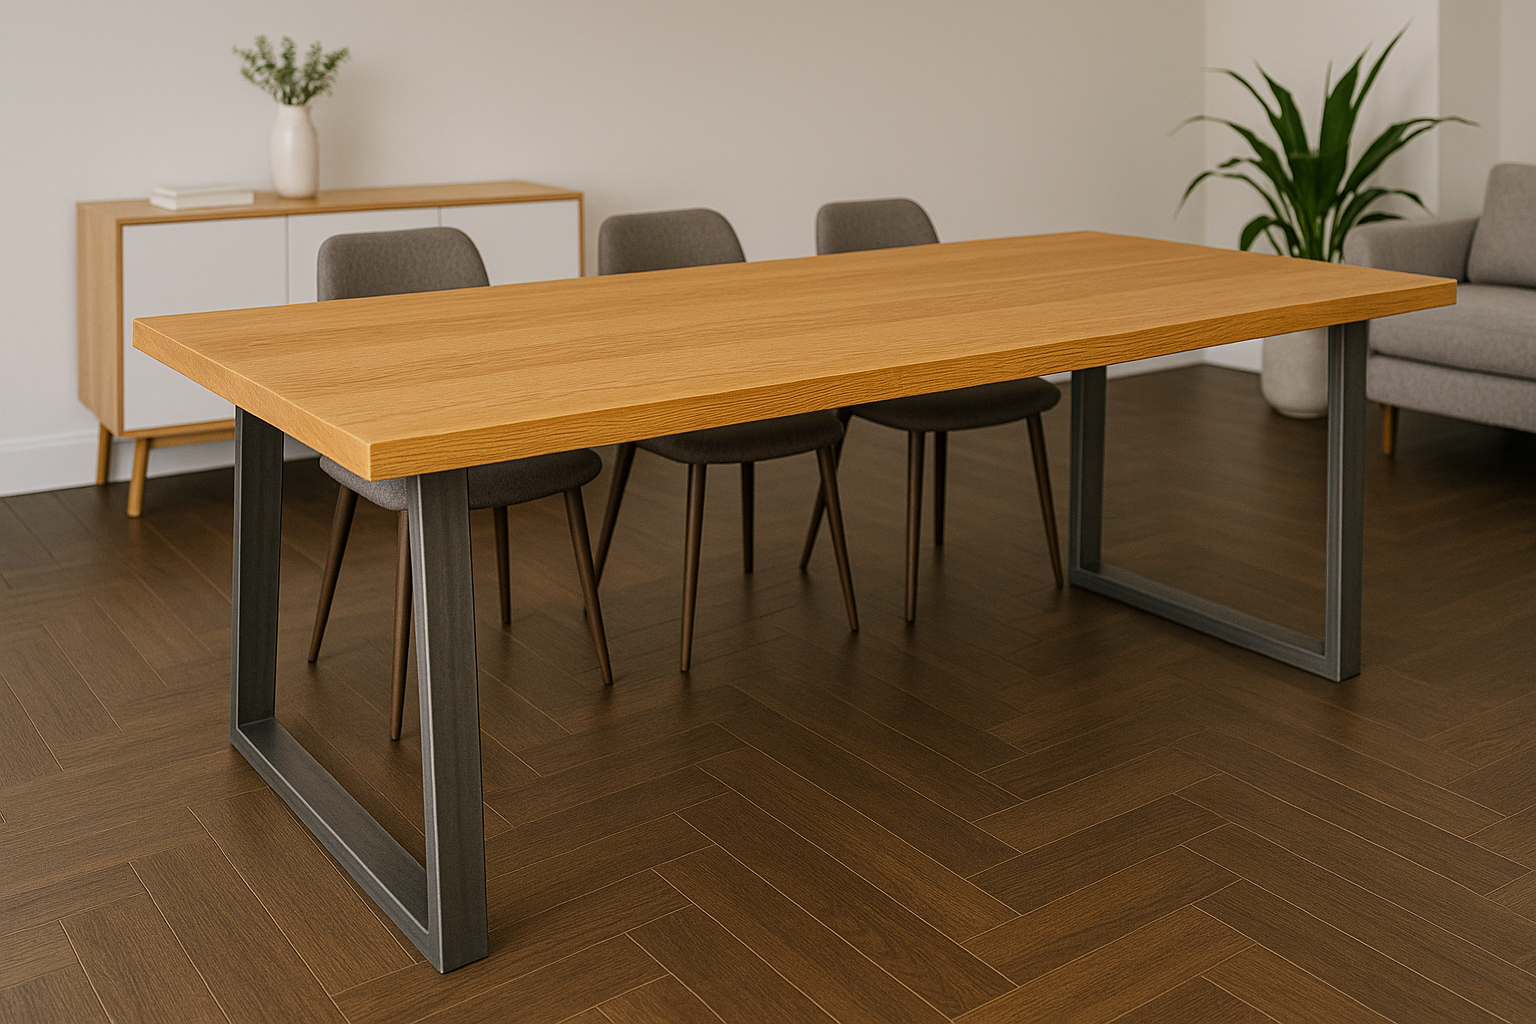
A dining table made with oak veneer and box section steel legs has a sleek, contemporary look. The steel brings bold, geometric lines, while the oak veneer offers the warmth and grain of real wood. Together, they create a table that works well in modern apartments, minimalist dining rooms, and Scandinavian-inspired spaces. It’s versatile enough to serve as both a family table and a stylish centrepiece for entertaining guests.

What Box Section Steel Legs Are and How They Look

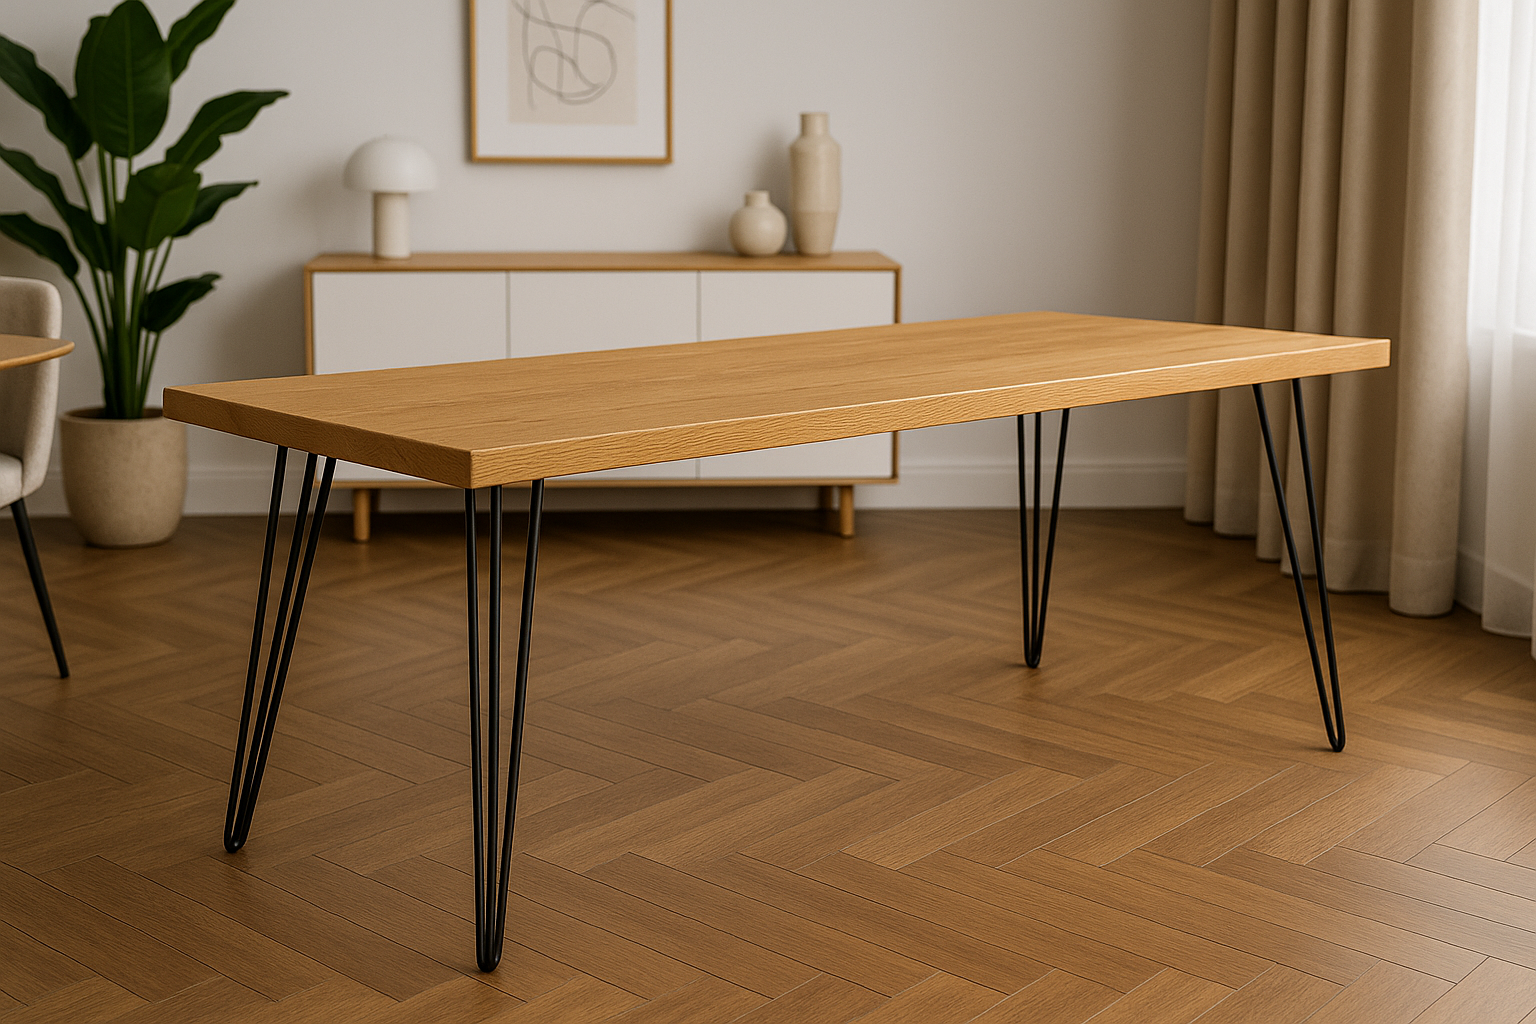
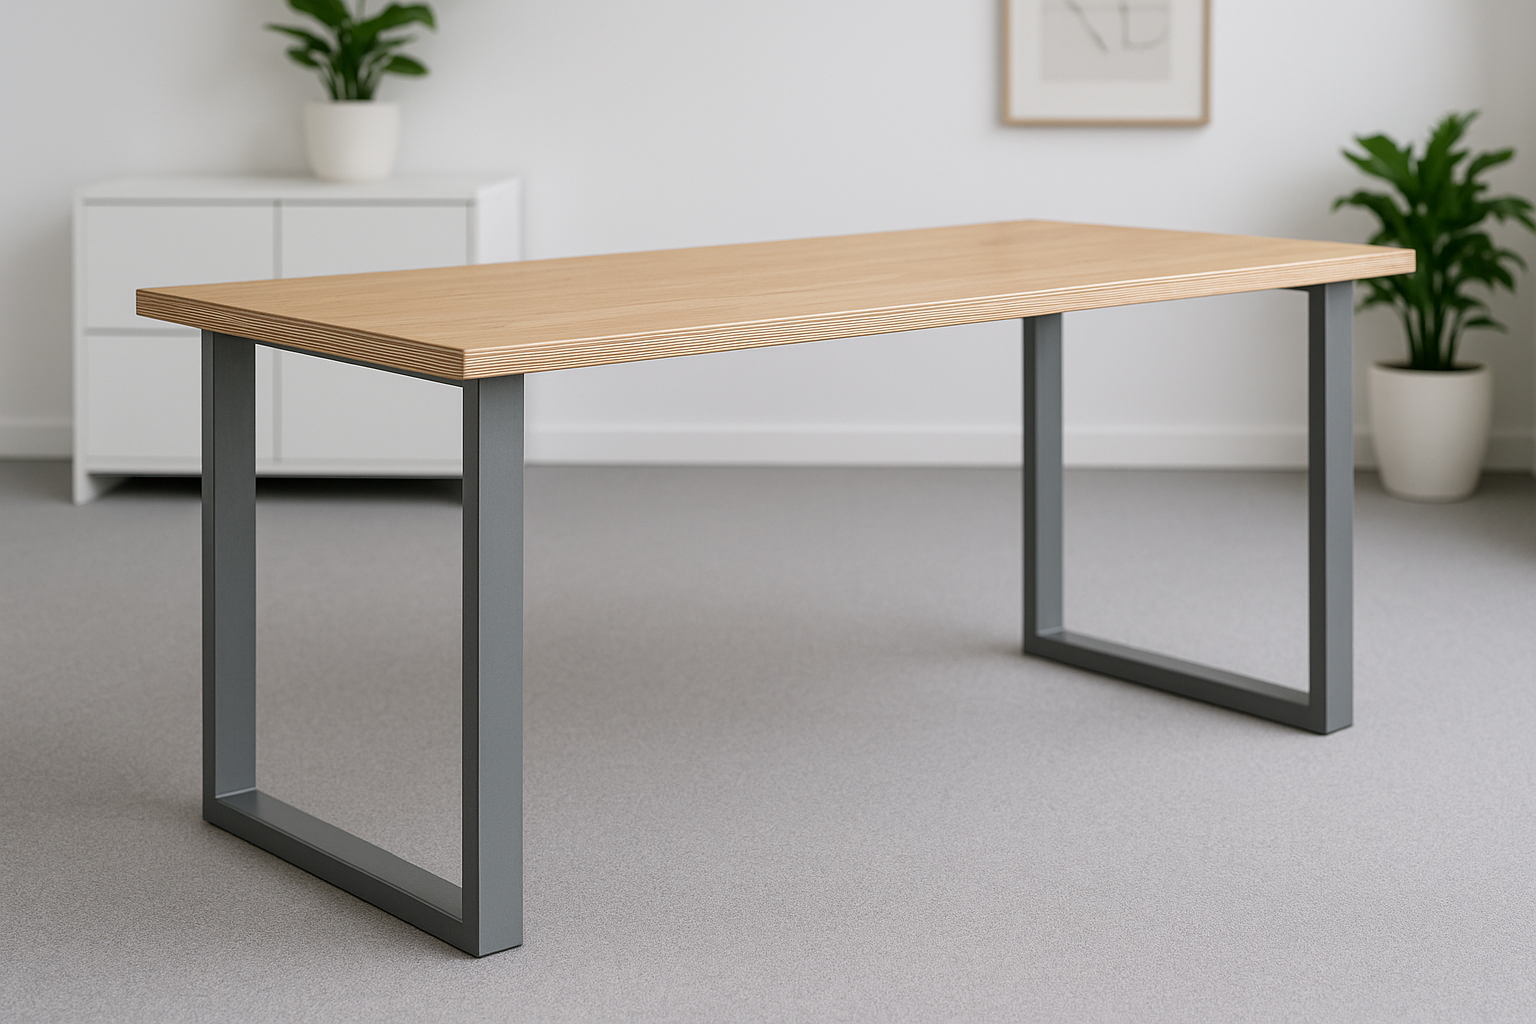
Box section legs are made from hollow rectangular or square steel tubing welded into rigid frames. Their clean, architectural lines give the table a grounded, structured look. They are incredibly strong, which makes them an ideal partner for veneered panels that need reliable support. Unlike slimmer hairpin legs, box section frames add substance and presence, making the dining table feel professional and substantial.

Why Oak Veneer and Steel Are a Good Match

Oak veneer is a thin layer of real oak bonded to a stable core such as MDF or particleboard. This makes it lighter and more affordable than solid oak, while still offering the appearance of natural grain. Steel box section legs balance the lightness of the veneer by adding strength and visual weight. The combination creates a modern piece of furniture that blends natural warmth with industrial sharpness, striking the right balance between style and practicality.

Choosing the Right Colour for the Legs

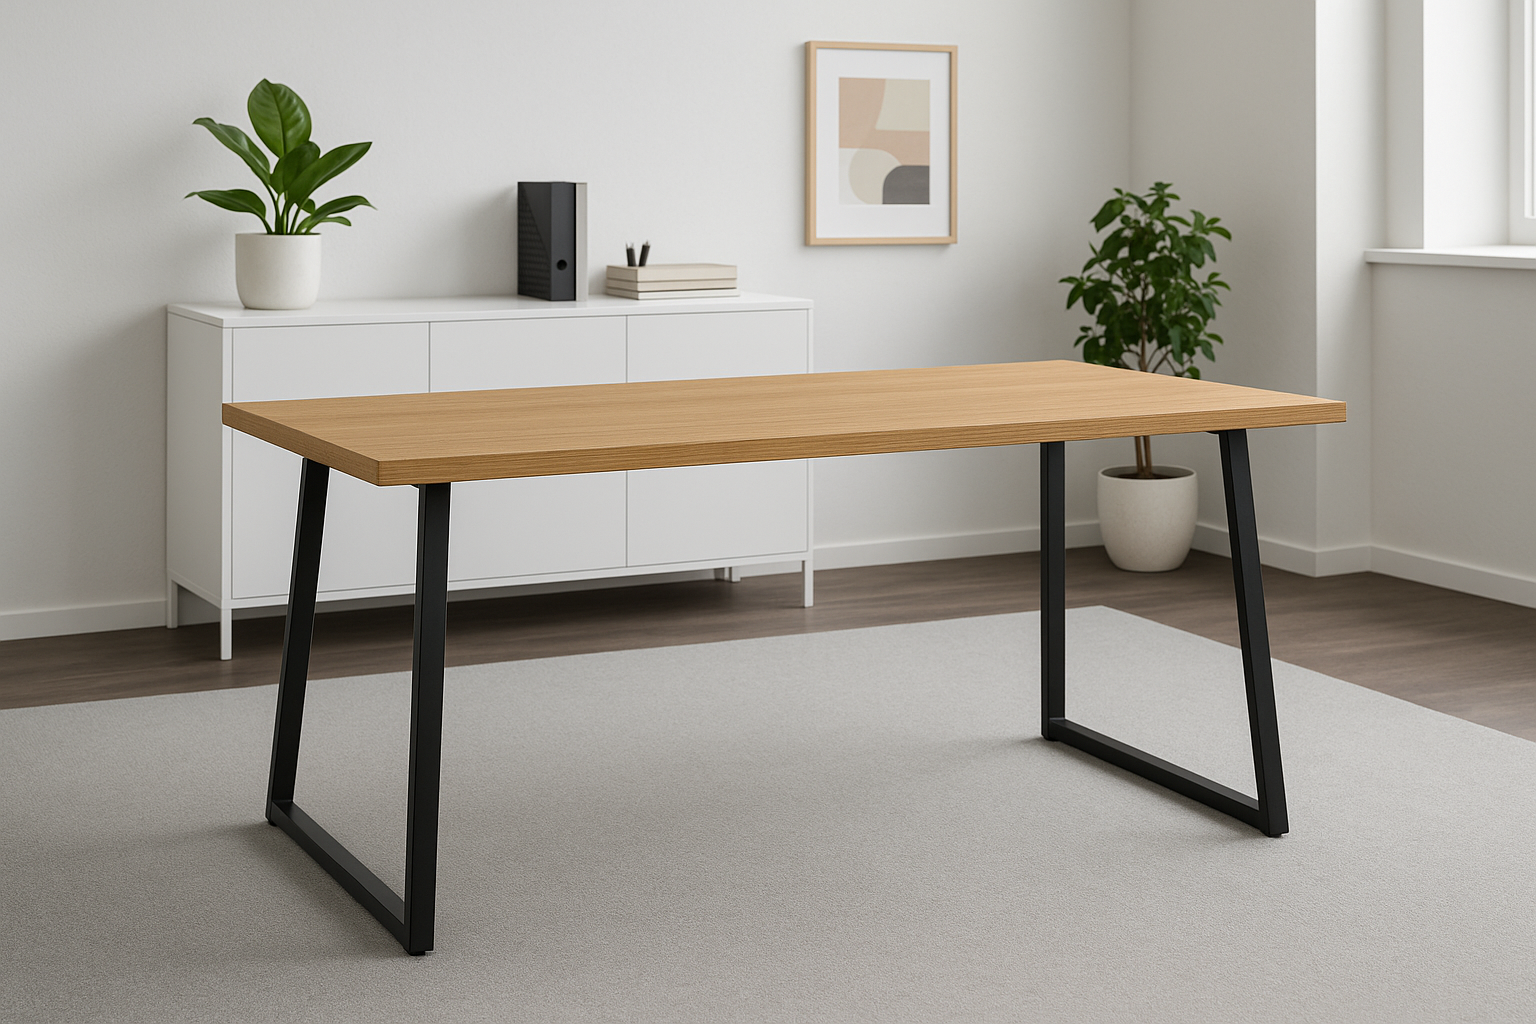
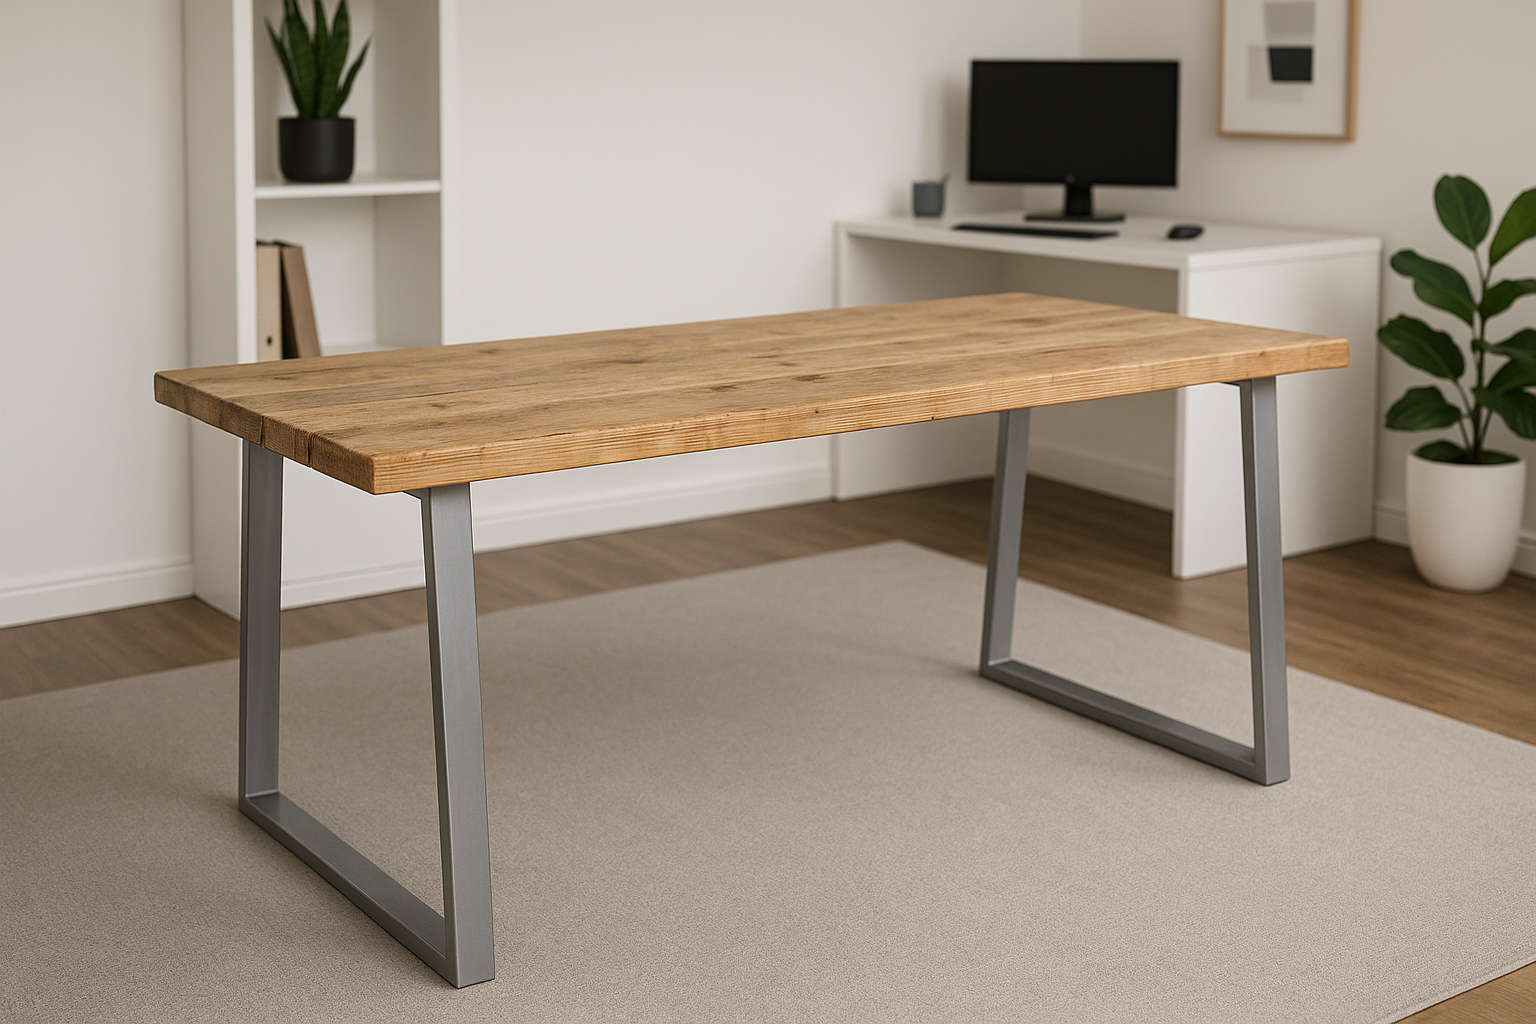
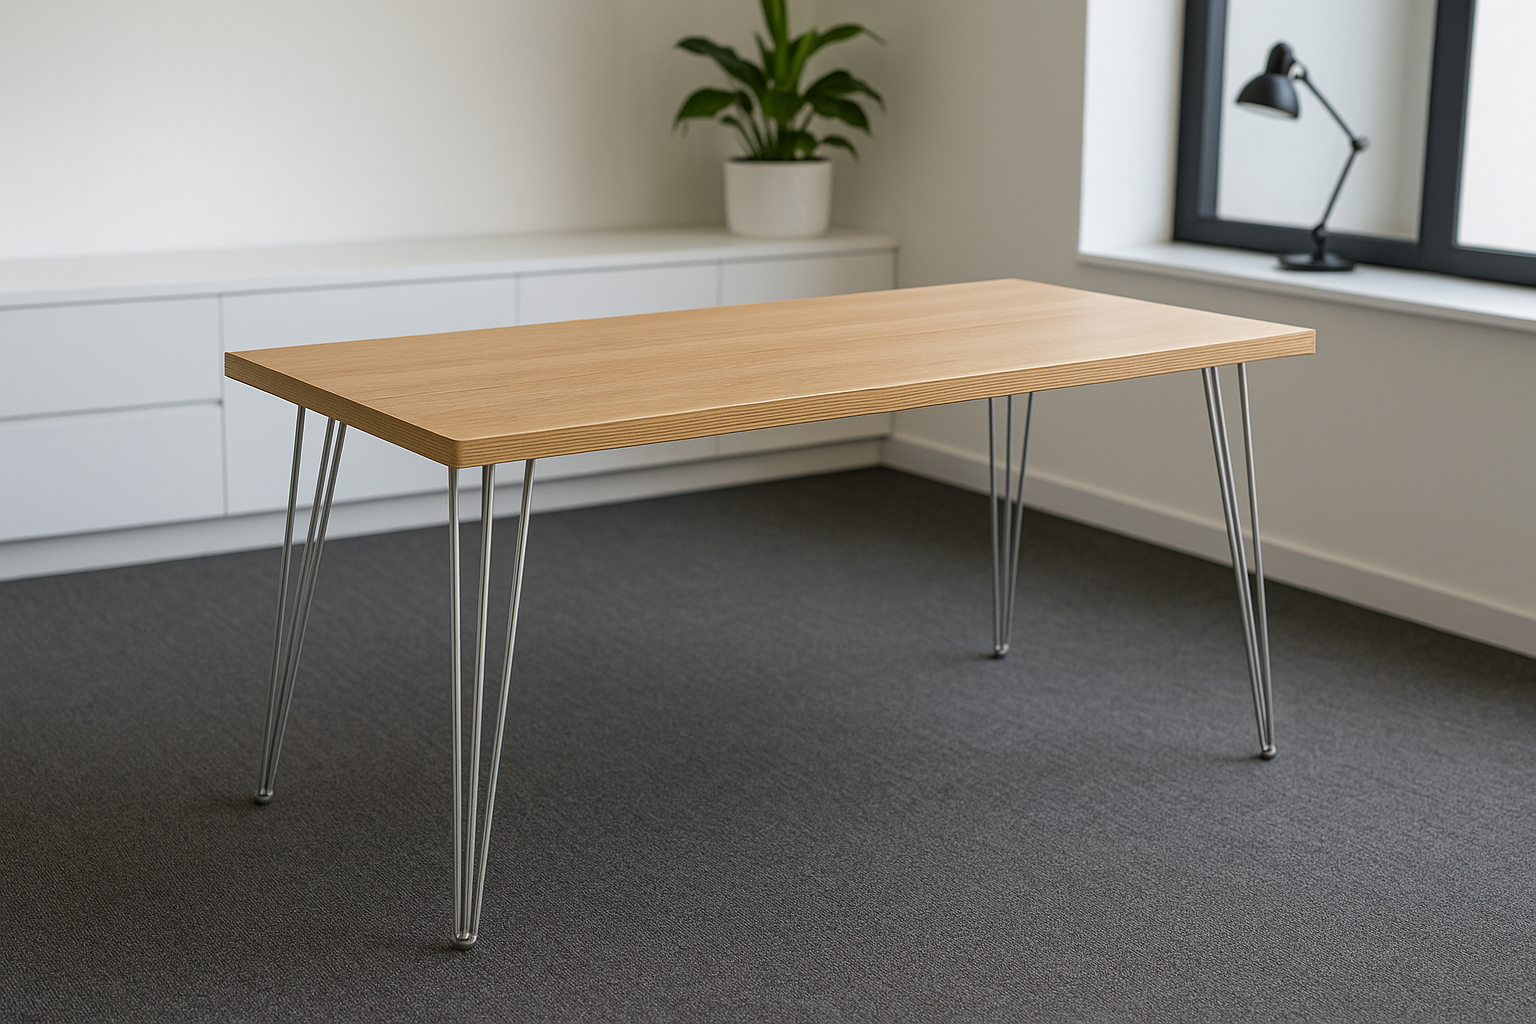
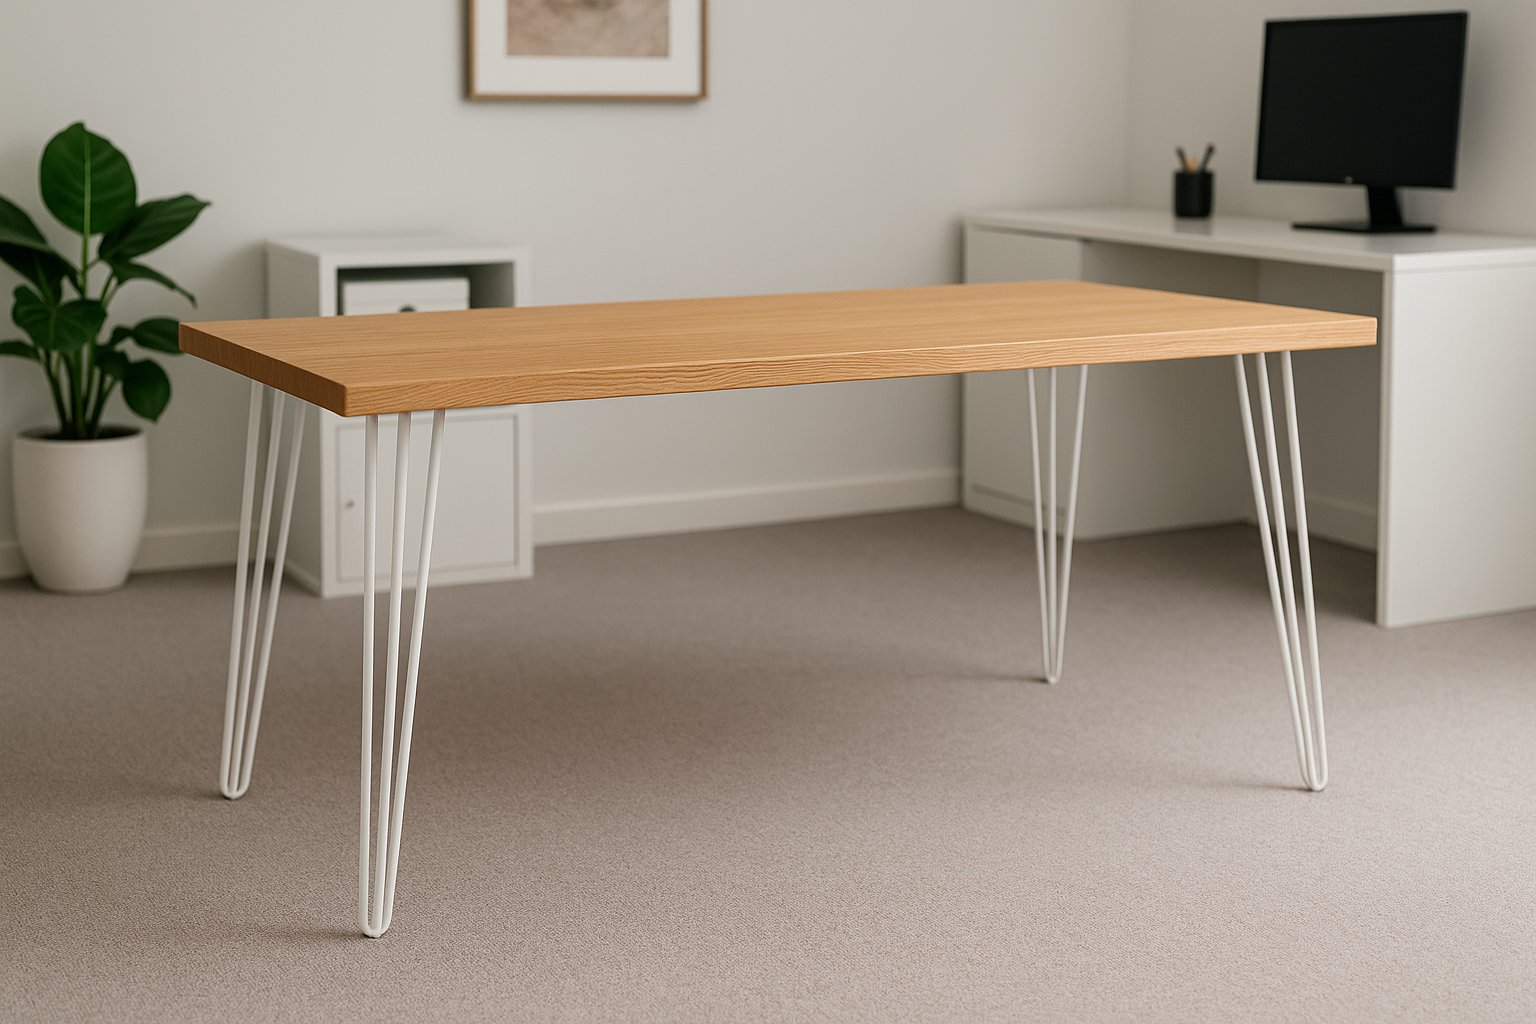
The colour of your legs sets the tone for the whole table. Black is the classic choice, providing contrast with the oak veneer and suiting almost any setting. White feels lighter and fresher, ideal for bright, modern spaces. Raw steel has a raw industrial edge but must be sealed to avoid rust. If you want a custom colour, you can paint the legs yourself — sanding first to help adhesion and then applying paint by spray or brush. A protective topcoat will extend durability.

Why Oak Veneer Differs from Solid Oak

Oak veneer is a clever compromise between solid wood and cheaper laminates. Unlike laminate, which is only a printed pattern, veneer is made from thin slices of real oak, giving you authentic grain and texture. Unlike solid oak, it is bonded to a stable substrate, which means it doesn’t warp or move with humidity in the same way. However, veneer has its limitations: because the top layer is thin, it cannot be sanded and refinished repeatedly, and once damaged it is more difficult to repair.

Durability and Daily Use

It’s important to understand how oak veneer performs in real life. Dining tables are subject to constant wear and tear — hot plates, spills, knocks, and scratches. While a solid oak table can be sanded and refinished many times, a veneered table top will not last as long if it is heavily used. Veneer can chip or wear through if mistreated. The key to making an oak veneer dining table last is to use placemats and coasters regularly, avoid putting hot items directly on the surface, and wipe up spills quickly. With care, a veneer top can stay beautiful for many years, but it requires more protection than solid wood.

Choosing the Thickness of Veneered Boards

Veneered panels are typically available in thicknesses of 18mm, 22mm, or 25mm. Thicker panels give the table a more substantial look and help prevent sagging, particularly on larger dining tables. Eighteen millimetres is fine for smaller tables, while 22mm or 25mm is a better choice for longer spans where extra strength is needed. Because veneer panels are lighter than solid oak, opting for a thicker size is often a good idea to create a sturdy, premium feel.

The Realities of Working with Veneer

Veneer is attractive but requires care during preparation. Because the surface layer is thin, sanding must be done very lightly to avoid going through to the substrate. Cutting veneer can also be tricky because of the risk of chipping along the edges. Using a fine-tooth blade, scoring the cut line with a knife, or applying masking tape along the cut can help minimise damage. Veneer doesn’t have the same depth of character as solid oak, but it still offers a convincing oak look at a lower price.

Cutting and Preparing the Top

If you decide to cut your veneered board yourself, use a track saw for the most accurate results. A fine-tooth circular saw blade can also work, but precision is important. Always wear goggles, hearing protection, and a dust mask. If you don’t have access to good tools, many suppliers sell veneered boards pre-cut to size, saving you the trouble of cutting while ensuring clean, professional edges.

Reinforcing Longer Tables

Although veneered boards are stable, they can still sag under heavy use over long spans. For dining tables longer than 150cm, it’s wise to add a lengthwise batten or spine underneath for reinforcement. This simple step prevents sagging and helps the table stay sturdy over time.

Positioning the Box Section Legs

Box section legs should be positioned about 5–8cm in from each end of the table for stability and balance. If the table will be placed against a wall, check that the legs won’t clash with skirting boards. It’s also important to test with chairs to ensure the frames don’t obstruct comfortable seating.

Sanding Oak Veneer

Sanding veneer requires a delicate touch. Start with fine sandpaper, around 180 grit, and sand lightly with the grain. Avoid aggressive sanding, especially with power tools, to prevent going through the veneer layer. For edges, hand sanding is safest. The goal is simply to smooth the surface and prepare it for finishing, not to remove material.

Pilot Holes and Edge Treatments

When attaching the legs, always drill pilot holes to prevent the substrate from splitting. Edges of veneered boards often expose the core material, which can be softened with sanding or finished with iron-on edge banding for a seamless oak appearance. If you want to add a profile, a very subtle chamfer or rounded edge is possible, but it must be done with care because the veneer layer is thin.

Finishing the Veneer Top

Finishing protects the surface and enhances the oak grain. Hardwax oil is a great option, leaving a natural matte finish and providing reasonable durability. Danish oil or tung oil add warmth and depth but may need reapplying. Varnishes and polyurethanes create the toughest surface, protecting against stains and scratches, though they can sometimes look shinier than oils. For veneer, thin, careful coats are best, and sanding between coats should be done very lightly.

Conclusion

A dining table with an oak veneer top and steel box section legs is a stylish and cost-effective project. It combines the natural beauty of oak with the strength and clean lines of steel, creating a piece that works well in modern and minimalist interiors. Veneer offers affordability and stability, though it does require care: unlike solid oak, it cannot be endlessly refinished, and it will only stay looking good if you protect it from daily wear with placemats and coasters.

With careful planning, accurate cutting or pre-cut panels, light sanding, and a protective finish, you can create a dining table that looks modern and elegant while being practical for everyday use. It may not have the lifespan of a solid oak table, but treated with respect, it can serve your home beautifully for many years.

Posted on

How to Make a Dining Table with an Oak Top and Steel Box Section Legs

A dining table is more than just a surface; it’s the heart of the home, where meals are shared and conversations linger. Building your own table is a rewarding project, giving you the chance to combine strength, beauty, and practicality in a way that fits your space perfectly. One of the most popular designs today combines a solid oak top with steel box section legs. This pairing creates a table that is modern yet timeless, balancing the warmth of natural wood with the bold geometry of steel.

The Style of the Table and Where It Belongs

A dining table with a solid oak top and box section steel legs has a strong, architectural style that works beautifully in a range of interiors. The steel frames provide a bold, grounded presence, while the oak top adds richness and warmth. This combination is perfectly suited to industrial lofts, modern rustic homes, and contemporary apartments, but it also works in traditional settings because oak has such a classic, enduring appeal. Whether in a family kitchen or a stylish dining room, the table looks substantial, professional, and elegant.

What Box Section Steel Legs Are and How They Look

Box section legs are made from square or rectangular hollow steel tubing welded into a rigid frame. Their geometric shape gives them clean, sharp lines, making them a striking counterpoint to the organic flow of wood grain. They are available in rectangular frames, trapezoids, and other custom shapes, offering flexibility in style while maintaining strength. Unlike slim hairpin legs, box section legs have a bold, structural quality that makes the table feel solid and professional.

Why Oak and Steel Work So Well Together

Oak is one of the most valued hardwoods, known for its durability, strength, and timeless grain patterns. Paired with steel, its natural beauty is elevated by contrast. The steel legs prevent the oak from looking too rustic or heavy, while the oak top stops the steel from feeling too cold or industrial. Together they strike a balance between tradition and modernity, creating a piece that feels contemporary yet rooted in craftsmanship. This balance of materials is what makes the oak-and-steel dining table such a popular choice for today’s interiors.

Choosing the Right Colour for the Legs

The colour of your steel legs can change the feel of the entire table. Black is classic and versatile, pairing beautifully with both light and dark oak finishes. White offers a lighter, fresher look that suits Scandinavian and minimalist interiors. Raw steel has an industrial edge but usually requires sealing to prevent rust. If you want something unique, you can paint the legs in a colour of your choice. Sand them lightly before painting to help the coating adhere, then apply with either a brush or spray. Spraying tends to give the smoothest finish, while a clear topcoat will protect the legs from scratches and marks.

Choosing the Thickness of the Oak

The thickness of the oak top determines both the table’s appearance and performance. Common sizes include 19mm, 24mm, 27mm, 30mm, and 40mm. Nineteen millimetres gives a sleek, modern profile but may need reinforcement on longer spans. Twenty-four millimetres is often the best balance between cost, weight, and strength, while 27mm and 30mm feel more substantial without being unwieldy. At 40mm, the table becomes bold and chunky, making a dramatic statement but also adding considerable weight. For dining tables, most people find 24mm or 27mm a good compromise.

The Realities of Using Solid Oak

Oak is a natural hardwood, so you should expect variations. Knots, medullary rays, and changes in tone are common and contribute to its character. Some suppliers offer prime oak, which has fewer knots and a more uniform look, while character oak celebrates all the natural quirks. Both grades make beautiful tables — it simply depends on whether you prefer a more refined or more rustic aesthetic.

Cutting the Oak to Size

If you plan to cut your oak top yourself, precision is important. A circular saw fitted with a fine-tooth blade can handle the job, but a track saw will give the straightest, cleanest results. Always measure carefully, mark clearly, and cut slowly. Oak is dense and produces fine dust, so use goggles, a dust mask, and hearing protection. Dust extraction is also recommended. If you don’t have the tools or prefer convenience, many suppliers offer oak tops pre-cut to size, saving you time, effort, and mess.

Preventing Cupping and Sagging

Like all wood, oak responds to humidity. Seasonal changes can cause the boards to cup slightly, where the edges curve upward or downward. To reduce this, you can attach bars across the underside running perpendicular to the grain. Wooden battens screwed into place are simple and effective, while metal bars routed into the underside provide greater reinforcement but require more skill and expense. For dining tables longer than 150cm, adding a lengthwise batten or “spine” underneath helps prevent sagging in the middle.

Positioning the Box Section Legs

The placement of the legs is crucial to both stability and comfort. Position them about 5–8cm in from each end of the table for a balanced look. If your table will be placed against a wall, make sure the legs don’t clash with skirting boards. It’s also a good idea to test legroom with chairs before fixing the legs permanently, since box section frames take up more space than slimmer designs.

Sanding the Oak

Sanding prepares the oak surface for finishing and ensures it is smooth and comfortable to use. Begin with a medium grit such as 120 and work up to 180 or 240 for a polished surface. Always sand with the grain to avoid scratches. An electric sander will speed up the process, but hand sanding is equally effective if you prefer a traditional approach or don’t own power tools. A little extra attention to the edges and corners will make the table more pleasant to use.

Pilot Holes and Edge Profiles

Before attaching the legs, drill pilot holes into the underside of the oak. This prevents splitting and makes it easier to insert screws cleanly. For the edges, you can add detail with a router, such as a chamfer, bevel, or round-over, or you can simply ease the corners with sandpaper. Even subtle shaping improves comfort and gives the table a professional finish.

Finishing the Oak Top

A finish protects the oak from spills and enhances its natural beauty. Hardwax oil is a popular choice for dining tables, providing a matte, natural look while highlighting the grain. Danish oil and tung oil also work well, deepening the wood’s colour and adding warmth, though they may need occasional reapplication. Varnishes and polyurethanes create the most durable surface, protecting against stains and scratches, though they can sometimes appear shinier than oils. Apply multiple thin coats, sanding lightly between applications, to achieve a smooth, resilient finish.

Conclusion

A dining table with a solid oak top and steel box section legs combines durability, modern design, and timeless character. The oak provides warmth and tradition, while the steel adds structure and a contemporary edge. By choosing the right thickness, cutting carefully or ordering pre-cut, reinforcing against natural movement, sanding thoroughly, and finishing thoughtfully, you can create a table that looks professional and lasts for many years.

This style is ideal if you want a piece that feels bold, substantial, and versatile. It is a table that works as well in a modern loft as in a rustic home, proving that oak and steel are a partnership that never goes out of fashion.

Posted on

How to Make a Dining Table with Hairpin Legs and a Solid Oak Top

There’s something deeply satisfying about building your own furniture, and few projects are as rewarding as making a dining table. A table is more than just a surface; it’s a place where family and friends gather, where meals are shared, and where memories are made. One of the most popular modern designs combines slim steel hairpin legs with a solid oak top, giving you a table that is both timeless and contemporary. It’s a piece of furniture that balances warmth and strength while remaining versatile enough to suit a wide variety of interiors.

The Style of the Table and Where It Belongs

A dining table made with hairpin legs and a solid oak top has a character that feels minimal yet inviting. The thin steel legs provide a lightness that prevents the table from overwhelming a room, while the oak top introduces depth, texture, and natural warmth. This style of table works beautifully in Scandinavian-inspired homes where pale woods and clean lines dominate, but it also looks right at home in industrial lofts with exposed brick and concrete. In modern family homes, it strikes the right balance between practicality and design, while in mid-century spaces it pays homage to the 1940s origins of the hairpin leg.

What Hairpin Legs Are and Why They Work

Hairpin legs are crafted from bent steel rod, usually welded into a U-shape and attached to a mounting plate. They are available with two rods for lighter use or three rods for greater strength. Originally designed during the mid-20th century, they remain popular because of their slim, elegant profile and their ability to hold substantial weight without looking bulky. On a dining table, they give the oak top a sense of lightness and ensure that the focus stays on the wood itself.

Why Hairpin Legs Combine Well with Solid Oak

Oak is a dense hardwood that brings richness and durability to a table. Without careful pairing, though, an oak top can sometimes look overly heavy. Hairpin legs provide the perfect counterbalance: they are thin, refined, and almost disappear visually, allowing the oak to shine. The combination is one of strength and contrast — the rugged, timeless look of oak softened by the minimal elegance of steel. Together, they make a dining table that feels substantial but not overpowering.

Choosing the Right Colour for the Legs

The finish of your hairpin legs has a big impact on the look of the table. Black is the most classic and versatile option, working well with both light and dark oak finishes. White creates a fresher, airier feel that suits bright, minimal interiors. Raw steel has a raw industrial character but requires sealing to prevent rust. If you want something more customised, the legs can be painted in a colour of your choice. Lightly sanding them first helps paint adhere, and either brushing or spraying can be used depending on the finish you want. Spraying generally gives the smoothest result, while brushing allows for easy touch-ups. Adding a protective clear coat improves durability.

Why Solid Oak Stands Out from Cheaper Alternatives

Unlike laminated or veneered products, solid oak is consistent all the way through. It can be sanded, refinished, and repaired many times, giving it a lifespan that can stretch across decades. Laminated boards may look convincing at first but are prone to chipping and cannot be restored once damaged. Veneered panels offer a real wood surface but are limited by their thin top layer, which wears down over time. Oak, on the other hand, has a natural strength and presence that elevates a dining table, making it an investment as well as a functional piece of furniture.

Choosing the Thickness of the Oak Top

The thickness of the oak you choose will affect both the table’s performance and its appearance. Typical sizes from timber suppliers include 19mm, 24mm, 27mm, 30mm, and 40mm. A 19mm top feels sleek but may need reinforcement for longer spans. Twenty-four millimetres is often the best compromise between strength, price, and weight, while 27mm and 30mm look more substantial without being overly heavy. At 40mm, the table will be chunky, dramatic, and very solid, though the weight makes handling and assembly more challenging. The thicker the top, the less likely it is to sag, and the more premium it will look in a dining room.

The Realities of Working with Oak

Oak is a natural material, and with that comes character. Expect knots, variations in colour, and distinctive medullary rays, which appear as pale streaks across the grain. These features give oak its timeless look, though if you prefer a cleaner appearance, many suppliers offer prime-grade oak with fewer knots. Character-grade oak, on the other hand, embraces all the natural quirks. Neither option is better than the other — it simply depends on whether you want rustic charm or refined consistency.

Cutting the Oak to Size

If you plan to cut the oak yourself, accuracy is key. A circular saw with a fine-tooth blade is suitable, but a track saw will give you the most precise and straight cuts. Always measure carefully, mark clearly, and cut slowly. Because oak is dense and produces fine dust, wear safety goggles, a dust mask, and hearing protection, and if possible, use dust extraction. If you don’t own the right saws or want a cleaner, simpler process, many suppliers will cut oak tops to size for you. This ensures accurate dimensions and reduces both waste and mess, though it adds slightly to the cost.

Preventing Cupping and Sagging

As a natural hardwood, oak moves with changes in humidity. Over time, this can cause boards to cup, where the edges rise or fall slightly. To help prevent this, many makers attach bars across the underside of the table running perpendicular to the grain. These can be wooden battens screwed into place or metal bars routed into the underside. Wooden strips are simple and affordable, while metal is stronger but more expensive and requires more skill to fit. For dining tables longer than 150cm, it’s also wise to add a lengthwise batten or “spine” underneath to prevent sagging.

Positioning the Hairpin Legs

When it comes to attaching the legs, place them around 5–8cm in from the corners of the table. This ensures the table is stable without the legs sticking out awkwardly. If the table will be placed against a wall, make sure the legs don’t clash with skirting boards. It’s also a good idea to test the placement with chairs before fixing, as you’ll want to avoid having table legs that interfere with seating.

Sanding the Oak

Sanding prepares the oak surface for finishing and brings out its natural beauty. Start with a medium grit such as 120 and work up to 180 or 240 for a silky finish. Always sand with the grain to avoid scratches. An electric sander is the quickest way to achieve a smooth surface, but hand sanding is equally effective if you prefer a more traditional approach. Even lightly easing the edges with sandpaper makes the table more comfortable to use and gives it a professional finish.

Pilot Holes and Edge Profiles

Before attaching the legs, drill pilot holes into the underside of the oak. This prevents the wood from splitting and makes it easier to drive the screws cleanly. For the edges, you can use a router to create a chamfer, bevel, or rounded profile, or simply ease them by hand with sandpaper. Even subtle shaping makes the table more inviting and comfortable to use.

Finishing the Oak Top

Finishing is essential to protect the oak from spills and to highlight its grain. Hardwax oil is a popular choice for dining tables because it is easy to apply, enhances the natural beauty of the wood, and leaves a durable, matte finish. Danish oil or tung oil can also be used, giving a warmer tone and deepening the wood’s character, though they may need reapplying periodically. Varnishes and polyurethanes provide the toughest protection against stains and scratches, though they can sometimes look shinier than oils. For best results, apply several thin coats, sanding lightly between each one.

Conclusion

A dining table with hairpin legs and a solid oak top is a project that combines elegance, strength, and timeless style. The oak provides natural warmth and character, while the steel legs keep the table modern and refined. By choosing the right thickness of oak, preparing it carefully, reinforcing it where needed, and finishing it thoughtfully, you can create a table that looks professional, feels sturdy, and becomes a centrepiece in your home for years to come.

Whether your style leans towards minimal Scandinavian, bold industrial, or modern rustic, this combination is versatile enough to fit seamlessly. It’s a table that celebrates both the simplicity of steel and the richness of wood — a balance that makes for a piece you’ll be proud to gather around every day.

Posted on

How to Build a Desk with Steel Box Section Legs and an Oak Veneer Top

Creating your own desk is a fantastic way to combine style, practicality, and affordability. While solid oak is beautiful and timeless, it is also heavy and expensive. For many people, an oak veneer top paired with steel box section legs offers the perfect balance: the warmth and appearance of oak without the weight and cost, supported by strong steel legs that give the desk a contemporary edge. The result is a stylish, versatile piece of furniture that works well in almost any interior.

The Style of the Desk and Where It Belongs

A desk with an oak veneer top and steel box section legs has a clean, modern look that bridges natural and industrial design. The oak veneer provides the character and warmth of real wood grain, while the steel legs add structure, geometry, and strength. Together, they create a desk that feels both substantial and elegant. This style suits contemporary apartments, modern rustic homes, minimalist offices, and creative studios. The look is professional without being overly formal, and the combination of wood and steel allows the desk to blend into a wide range of décor.

What Box Section Steel Legs Are and How They Look

Box section legs are made from square or rectangular hollow steel tubing, welded into rigid frames. Their straight lines and sharp geometry give them an architectural quality, making the desk feel grounded and substantial. They are extremely strong and can support heavy tops without flexing. Unlike delicate hairpin legs, box section legs provide a bolder, more structured presence, making them ideal for a veneered desk top that you want to feel professional and reliable.

Why Oak Veneer and Steel Combine So Well

Oak veneer is a thin slice of real oak bonded onto a stable core material such as MDF or particleboard. This gives you the look and feel of solid oak at a fraction of the weight and cost, with the added benefit of greater stability. It doesn’t warp or move in response to seasonal changes the way solid wood does. Paired with steel box section legs, the result is a desk that looks natural, feels modern, and offers strength and practicality. The steel balances the lightness of the veneer, while the oak veneer softens the industrial edge of the steel.

Choosing the Right Colour for the Legs

Steel legs are commonly available in black, white, or natural steel. Black is the most versatile, pairing beautifully with the warm tones of oak veneer. White feels fresh and airy, working well in Scandinavian or minimalist interiors. Natural steel has a raw, industrial quality but must be sealed to prevent rust. If you want a custom colour, you can paint the legs yourself. Sand them lightly first, then apply either spray paint for a smooth finish or brush paint for a more hands-on approach. A clear topcoat adds extra protection against scratches and wear.

Why Oak Veneer Is a Practical Choice

Oak veneer sits between solid oak and cheap laminates. Unlike laminates, which are printed imitations, veneer is real oak on the surface, so it has genuine grain and texture. Unlike solid oak, it is bonded to a stable core, which makes it less prone to expansion, contraction, or cupping. Veneer cannot be sanded and refinished as many times as solid oak because the surface layer is thin, but with careful use, it can last many years while still offering the same natural look. It is lighter and more affordable than solid oak, making it a practical option for many DIY furniture projects.

Choosing the Thickness of the Veneered Board

Oak veneered boards are usually available in thicknesses of 18mm, 22mm, or 25mm. Thicker boards give the desk a more substantial look and reduce the risk of sagging over longer spans. Eighteen millimetres is fine for a small desk, while 22–25mm is better for larger tops or heavier use. Because veneer is lighter than solid oak, going a little thicker is often a good idea to achieve a sturdy feel.

The Realities of Using Veneer

Veneer is beautiful but needs a little care. The surface is thin, so sanding must be done gently to avoid going through to the substrate underneath. Veneered boards can sometimes show small seams or patches where sheets of veneer are joined, but these are usually subtle and disappear once the desk is finished. Unlike solid oak, veneer doesn’t have the same depth of character, but it provides a convincing oak look at a much lower cost.

Cutting Veneered Boards to Size

If you’re cutting veneer yourself, precision is important to avoid chipping. A circular saw with a fine-tooth blade works, but a track saw gives the cleanest cuts. Scoring the cut line with a sharp knife before sawing and applying masking tape over the line can also help reduce splintering. Always wear goggles, hearing protection, and a dust mask, and keep the board securely clamped while cutting. If you want to avoid the hassle, many suppliers offer veneered panels pre-cut to size. This ensures perfect edges, saves time, and reduces waste, though it comes at a slightly higher cost per square metre.

Reinforcing Longer Desks

Although veneered boards are stable, they can still sag over long spans. For desks over 150cm, consider attaching a lengthwise batten or spine underneath to add stiffness. This reinforcement is simple to install and will help the desk maintain its shape and strength over time.

Positioning the Box Section Legs

When attaching the legs, position them about 5–8cm in from each end. This provides balance without protruding awkwardly. If the desk will be placed against a wall, check that the legs don’t clash with skirting boards. It’s also worth testing the legroom with a chair before fixing the legs, since box section frames can take up more space than slimmer designs.

Sanding Oak Veneer

Oak veneer needs gentle sanding to prepare for finishing. Start with a fine grit such as 180 and sand lightly with the grain. Avoid using coarse sandpaper or applying too much pressure, especially with power sanders, as you risk sanding through the veneer. Hand sanding is often the safest method, giving you more control and reducing the risk of damage.

Pilot Holes and Edge Treatments

When fixing the legs to the underside, always drill pilot holes first. This prevents the substrate from splitting and ensures clean screw placement. Veneered boards often have exposed core material on the edges, which you can soften with light sanding or cover with iron-on edge banding for a seamless oak look. A router can add a small chamfer or rounded edge, but this needs to be done carefully to avoid cutting through the veneer.

Finishing the Veneer Top

A finish protects the veneer and brings out the oak’s natural beauty. Hardwax oil is a popular choice, leaving a durable, matte finish that enhances the grain. Danish oil and tung oil also work well, giving a warm tone, though they may need reapplication over time. Varnishes and polyurethanes provide a tougher surface layer, making them resistant to spills and scratches, though they can sometimes look shinier than oil finishes. Whichever product you choose, apply several thin coats with a brush, roller, or cloth, and lightly sand between coats for the smoothest result.

Conclusion

A desk made with an oak veneer top and steel box section legs is a project that blends natural style with modern strength. The veneer provides the warmth and beauty of real oak in a lightweight, cost-effective form, while the steel legs give the desk structure and presence. Together, they create a piece that looks professional, feels durable, and fits seamlessly into a wide range of interiors.

By choosing the right thickness, cutting carefully or ordering pre-cut, reinforcing longer spans, sanding gently, and applying a thoughtful finish, you can build a desk that not only serves your needs but also looks like a piece of high-end furniture. This approach is ideal if you want the appearance of oak without the weight or expense of solid timber, making it a smart choice for stylish, practical DIY furniture.

Posted on

How to Build a Desk with Steel Box Section Legs and a Solid Oak Top

Building your own desk is one of the most rewarding DIY projects you can take on. You get the satisfaction of creating something functional, beautiful, and tailored to your needs. A particularly popular combination is a solid oak top paired with steel box section legs. This pairing gives you a desk that is both timeless and contemporary: the natural warmth of oak balanced by the bold geometry of steel. The result is a workspace that feels premium, sturdy, and professional.

The Style of the Desk and Where It Belongs

A desk with a solid oak top and steel box section legs has a distinctive style that combines rustic tradition with modern minimalism. Oak brings warmth, grain, and natural charm, while the steel legs add structure and a clean, architectural presence. This combination works beautifully in industrial lofts, modern rustic homes, and contemporary apartments where bold materials are part of the aesthetic. At the same time, it looks right at home in more traditional settings because oak has long been valued as a classic furniture wood. The balance of raw metal and refined timber makes this style versatile enough for a home office, creative studio, or even a boardroom table.

What Box Section Steel Legs Are and How They Look

Box section legs are made from square or rectangular hollow steel tubing welded into a rigid frame. They can be manufactured in a variety of shapes, from straight rectangular frames to trapezoids or even custom angular forms. Their appearance is bold and geometric, with sharp lines that contrast with the softness of wood grain. They provide immense strength, capable of supporting heavy tops like oak without flexing. The look is solid and substantial, giving the desk a professional presence while still being clean and modern.

Why Oak and Steel Combine So Well

Oak and steel are a natural pairing. Oak is heavy, tactile, and full of character, while steel is sleek, industrial, and modern. Together they create balance: the steel keeps the oak from feeling too rustic or heavy, while the oak prevents the steel from looking too cold or sterile. This mix of natural and engineered materials has become a hallmark of modern design, often referred to as industrial-chic or modern rustic. It’s a combination that not only looks good but also results in a desk that is strong, durable, and built to last.

Choosing the Right Colour for the Legs

Box section legs are usually available in black, white, or raw steel. Black is the classic choice that works in nearly all settings, offering a sharp contrast against oak’s warm tones. White feels lighter and pairs well with pale or lightly finished oak, suiting Scandinavian-inspired interiors. Raw steel emphasizes the industrial character of the desk but must be sealed to prevent rust. For a unique touch, you can paint the legs yourself in a bespoke colour. Sand the surface lightly to help the paint adhere, then apply with a spray can or brush. Spraying tends to give the smoothest finish, while brushing is practical for smaller spaces. Adding a protective topcoat increases durability.

Choosing the Thickness of the Oak

The thickness of the oak top affects both the appearance and performance of the desk. Typical thicknesses available from timber suppliers are 19mm, 24mm, 27mm, 30mm, and 40mm. Nineteen millimetres looks sleek but may feel a little light for larger spans. Twenty-four millimetres is often the best compromise between strength, weight, and cost. Anything from 27mm upwards begins to look very substantial, while 40mm is chunky, dramatic, and very heavy. The thicker the oak, the less prone it will be to sagging, and the more premium the desk will feel. For most people, 24mm or 27mm provides the right balance.

The Realities of Using Oak

As a natural material, oak comes with features that you should expect and embrace. Knots are common and may be small or large depending on the grade of oak. Medullary rays—light streaks that run across the grain—are another distinctive characteristic. Some suppliers offer “prime oak,” which has fewer knots and a more uniform look, while character oak highlights all the variations and natural features. Both can make a beautiful desk, but it’s worth deciding in advance whether you prefer a clean, consistent look or something more rustic.

Cutting the Oak to Size

If you’re cutting the oak top yourself, accuracy is key. A circular saw with a fine-tooth blade can do the job, but a track saw is the best tool for ensuring straight, precise cuts. Always measure carefully, mark clearly, and cut slowly. Safety is essential when working with hardwood: wear goggles, hearing protection, and a dust mask, and use dust extraction if possible. Oak is dense and produces fine dust, so take the time to protect both yourself and your workspace.

If you don’t own the tools or prefer a cleaner process, consider ordering oak tops pre-cut to size. Many suppliers offer this service, and while it costs more per square metre, it guarantees square, accurate edges and reduces mess and wastage.

Preventing Cupping and Sagging

Solid oak, like all wood, moves with seasonal changes in humidity. Over time, this can lead to cupping, where the board edges curl slightly upward or downward. To minimise this, you can attach bars across the underside of the desk running perpendicular to the grain. These bars can be wooden battens screwed into place or, for a more engineered solution, steel bars routed into the underside. The key is to screw rather than glue them so the oak can still expand and contract naturally. For desks longer than about 150cm, it is also advisable to add a lengthwise batten or “spine” underneath to prevent sagging in the middle.

Positioning the Box Section Legs

The placement of the legs affects both stability and usability. Position them around 5–8cm in from each end of the desk to provide balance without sticking out awkwardly. If the desk will sit against a wall, check that the legs don’t clash with skirting boards. It’s also worth checking legroom before fixing the legs, as box section frames take up more width than slim hairpin legs. A quick mock-up before drilling can save frustration later.

Sanding the Oak

Sanding oak is straightforward but should be done carefully. Start with a medium grit such as 120 and work up to 180 or 240 for a smooth finish. Always sand with the grain to avoid scratches. An electric sander speeds up the process and gives an even result, but sanding by hand is a perfectly valid option if you enjoy the process or don’t own a machine. The goal is to create a smooth, comfortable surface ready for finishing.

Pilot Holes and Edge Profiles

Before attaching the steel legs, drill pilot holes into the underside of the oak. This prevents splitting and makes it easier to drive in screws. For a refined finish, consider shaping the edges of the top. A router can add a rounded or chamfered profile, while simply easing the corners with sandpaper makes the desk more pleasant to use. Even a subtle rounding improves comfort and gives the desk a professional look.

Finishing the Oak Top

Finishing protects the oak and enhances its natural beauty. Hardwax oil is one of the best options, as it is easy to apply, brings out the grain, and leaves a natural matte finish. Danish oil and tung oil also work well, soaking into the wood and giving it a warmer tone, though they may need periodic reapplication. Varnishes and polyurethanes create the toughest surface, protecting against spills and scratches, but can sometimes look overly glossy. For the best results, apply several thin coats, sanding lightly between applications.

Conclusion

A desk built with a solid oak top and steel box section legs is a project that combines natural beauty with industrial strength. The oak provides timeless warmth and character, while the steel adds a modern, architectural edge. Together they create a desk that is substantial, stylish, and built to last. By choosing the right thickness of oak, cutting accurately or ordering pre-cut, reinforcing against natural movement, sanding carefully, and finishing thoughtfully, you can create a desk that looks professional and serves you for many years.

This style is perfect if you want a desk that feels substantial, professional, and versatile. Whether you prefer a clean, prime oak surface or a characterful slab full of knots and rays, the combination of oak and steel box section legs creates a balance of rustic tradition and modern design that will never go out of style.

Posted on

How to Build a Desk with Box Section Steel Legs and Scaffold Boards

Building your own desk is a rewarding way to create something practical, affordable, and full of character. One of the most popular approaches in recent years has been to use scaffold boards for the top and pair them with box section steel legs. This combination blends industrial strength with rustic charm, creating a desk that looks bold and stylish while remaining functional and durable.

The Style of the Desk and Where It Belongs

A desk built with scaffold boards and box section steel legs has a strong, architectural look. The boards bring warmth and texture, while the squared metal legs add a sense of structure and presence. Unlike hairpin legs, which are slim and delicate, box section legs are heavier visually, giving the desk more substance and a grounded feel. This style suits industrial lofts, contemporary apartments, modern rustic homes, and creative studios where a piece of furniture needs to be both practical and eye-catching. It is a desk that feels substantial, reliable, and unapologetically modern.

What Box Section Steel Legs Are and How They Look

Box section legs are made from hollow square or rectangular steel tubing, welded into rigid frames. Their squared profile gives them sharp, geometric lines, which feel more architectural than the curves of hairpin legs. They are strong enough to support heavy tops like scaffold boards without flexing, and they can be made in rectangular, trapezoid, or even custom shapes depending on the supplier. The look is solid and professional, and the legs make the desk feel like it belongs as much in an office as in a home.

Why Box Section Legs Combine Well with Scaffold Boards

Scaffold boards are chunky, rustic, and full of character. Pairing them with slim legs might make the top feel overpowering, but box section legs provide balance. The steel frames mirror the substance of the boards, resulting in a desk that feels cohesive and solid. The contrast between rough, weathered wood and sleek, modern steel is striking and makes the desk stand out as a piece of industrial-inspired furniture. Together, they create a balance of old and new, rugged and refined.

Choosing the Right Colour for the Legs

Box section legs are usually available in black, white, or natural steel. Black is the most versatile choice, pairing effortlessly with the warm tones of scaffold boards. White feels lighter and works especially well in modern or Scandinavian-inspired interiors. Natural steel has an authentic industrial look but usually needs sealing to prevent rust. If you want a bespoke colour, you can paint the legs yourself. To do this properly, sand the steel lightly first, then paint with a brush or spray. Spraying usually produces a smoother, more even finish, while brushing allows for touch-ups. Adding a clear protective coat afterwards will improve durability.

Why Scaffold Boards Are Popular for DIY Furniture

Scaffold boards have become a staple for DIY furniture because they are affordable, readily available, and inherently robust. Originally designed for construction, they are thick, strong planks of softwood, usually around 38mm thick and 225mm wide. Their size makes them perfect for repurposing into furniture without needing a complex frame. Reclaimed scaffold boards carry marks, dents, and even paint splashes from years of use, which add to their rustic character. For a cleaner look, new boards can be bought untreated and sanded to a smooth finish. Either way, they bring authenticity and charm that flat-pack materials can’t match.

Dimensions of Scaffold Boards

Standard scaffold boards measure approximately 225mm in width and 38mm in thickness, with lengths up to around 3.9m. To make a desk, you usually join two or three boards edge to edge, depending on the size of the top you want. Their thickness means they can support weight well, and their width makes them practical to join together into panels.

The Realities of Using Scaffold Boards

Scaffold boards are natural wood, so you should expect imperfections. Reclaimed boards may have knots, cracks, dents, and even metal end bands. While many people value this rugged look, others may prefer new boards for a smoother finish. It’s worth remembering that wood is a living material, and its variations are part of its beauty.

Cutting the Boards to Size

If you’re cutting the boards yourself, a circular saw will do the job, but a mitre saw or track saw will give the cleanest results. Measure carefully, mark your cuts clearly, and clamp the boards securely before cutting. Safety is crucial—scaffold boards are heavy, so use protective goggles, hearing protection, and a dust mask. A dust extractor is useful to control sawdust and keep the work area cleaner.

If you don’t have the right saws, many suppliers sell scaffold boards pre-cut to size. This eliminates the need for heavy cutting, reduces waste, and ensures perfectly square edges. The downside is a higher cost per square metre, but the convenience is often worth it.

Joining Scaffold Boards Together

To create a wider desktop, you’ll need to join several boards side by side. The best method is to glue the edges and clamp them tightly until dry. For stronger joints, you can add dowels or wood biscuits, which help with alignment as well as durability. If you don’t want to glue, you can attach battens across the underside to hold the boards together. This is quicker but often leaves small gaps between boards, which may not be ideal for a writing surface.

Preventing Cupping and Sagging

Wood naturally moves with changes in humidity, and scaffold boards are no exception. Over time, they can cup, meaning the edges curve slightly. To prevent this, you can attach bars running across the underside of the desk. Wooden strips screwed in place are the simplest option, while metal bars routed into the underside provide stronger reinforcement but are more expensive and harder to fit. For desks longer than around 150cm, adding a lengthwise batten or spine underneath helps prevent sagging.

Positioning the Box Section Legs

When attaching box section legs, place them around 5–8cm in from each end. This gives the desk stability without the legs sticking out awkwardly. If the desk is going against a wall, make sure the legs won’t clash with the skirting board. It’s also worth sitting at the desk to check legroom before committing, as box section frames can take up more space than slim hairpin legs.

Sanding Scaffold Boards

Sanding scaffold boards is essential to turn them into a comfortable work surface. An electric sander makes the process quicker, starting with a coarse grit to remove roughness and then working up to a fine grit for smoothness. Always sand with the grain where possible. If you don’t own a sander, sanding by hand is perfectly possible, though it will take more time. Many DIY enthusiasts enjoy the process, finding it part of the satisfaction of working with real wood.

Pilot Holes and Edge Profiles

Before screwing the legs into place, always drill pilot holes. This prevents the boards from splitting and makes it easier to drive in screws. You can also shape the edges of your desktop for a more refined look. A router can create a rounded or chamfered profile, while hand sanding the corners will soften them just enough to make the desk more comfortable to use.

Finishing the Desk Top

Finishing is the final step that protects the wood and enhances its appearance. Hardwax oil is a great choice for scaffold boards, giving a natural matte finish while highlighting the grain. Other oils like Danish or tung oil provide a warmer tone but may need reapplying periodically. Varnishes and polyurethanes offer the most durable surface, protecting against spills and scratches, though they can sometimes appear shiny. Apply several thin coats, sanding lightly between each one, to achieve a smooth, professional finish.

Conclusion

A desk built with box section steel legs and scaffold boards is a project that brings together the best of industrial and rustic design. The robust wood gives warmth and character, while the strong steel legs add structure and a contemporary edge. With careful preparation—cutting, joining, sanding, reinforcing, and finishing—you can create a desk that is not only practical but also a statement piece in your home or office.

This style is ideal if you want something bold and durable, with a look that balances rough timber with modern steel. Whether you use reclaimed boards for character or new ones for a cleaner finish, the result will be a desk that feels substantial, stylish, and unique.

Posted on

How to Build a Desk with Hairpin Legs and Scaffold Boards

Few DIY projects are as rewarding as building your own desk. Not only do you save money compared to buying ready-made furniture, but you also get something unique that reflects your style. A particularly popular and characterful approach is to use hairpin legs combined with scaffold boards for the top. This creates a desk that feels sturdy, rustic, and modern all at once, perfect for home offices, studios, and even dining or craft tables depending on the size you build.

The Style of the Desk and Where It Belongs

A desk built from scaffold boards and hairpin legs has a style that straddles rustic charm and contemporary minimalism. The boards bring a raw, industrial quality, especially if reclaimed, while the slender metal legs add lightness and balance. This type of desk works well in industrial-inspired apartments with exposed brick and concrete, but it is equally at home in more eclectic interiors where a touch of rough-and-ready wood contrasts with clean design. In Scandinavian or modern rustic homes, the combination feels natural and authentic, especially if you choose a simple matte finish on the wood.

What Hairpin Legs Are and Why They Work

Hairpin legs are made from steel rod bent into a U-shape and welded onto a small metal plate for mounting. They are named for their resemblance to a bent hairpin and were first created in the 1940s. The design has endured because it is elegant, unobtrusive, and surprisingly strong. Available in two-rod or three-rod versions depending on the load they need to support, hairpin legs are visually light but structurally solid. They are ideal for pairing with heavier tops like scaffold boards because they stop the desk from looking overly bulky while still holding everything steady.

Why Hairpin Legs Combine Well with Scaffold Boards

Scaffold boards have a rugged, chunky look. On their own, they can appear quite heavy and utilitarian. Pairing them with slim hairpin legs creates the perfect balance: the boards bring character and substance, while the legs add elegance and modernity. This contrast makes the final piece versatile enough to sit in a sleek apartment or a rustic workshop. The steel and wood combination feels timeless, practical, and stylish in a way that appeals to many different tastes.

Choosing the Right Colour for the Legs

Hairpin legs usually come in black, white, or raw steel. Black is a classic choice that works in almost every situation, offering contrast against the pale or weathered tones of scaffold boards. White feels fresher and can soften the industrial look, blending well in Scandinavian or light-filled spaces. Raw steel emphasizes the industrial feel but must be sealed to prevent rust. If you want a more custom look, you can paint the legs yourself. Start by sanding them lightly to help paint adhere, then apply either with a brush or spray. Spray paint usually gives the most even coat, and adding a clear protective top layer will improve durability.

Why Scaffold Boards Are Popular for DIY Furniture

Scaffold boards have become a go-to material for DIYers because they are affordable, widely available, and full of character. Originally designed for construction scaffolding, they are made from strong softwood planks, usually around 38mm thick, and often reinforced with metal bands at the ends. Their chunky size, rustic look, and durability make them perfect for repurposing into tables, shelves, and desks. Many people enjoy the fact that reclaimed boards carry marks, dents, and weathering, which give the finished furniture a sense of history and authenticity.

Dimensions of Scaffold Boards

Standard scaffold boards are usually around 225mm wide and 38mm thick, with lengths up to 3.9m. To make a desk top, you typically join two, three, or four boards side by side depending on the width you want. The thickness makes them robust, and the width is practical for gluing up into panels. Because of their size, scaffold boards can create a top that feels substantial without needing a frame underneath.

The Realities of Using Scaffold Boards

As with any natural material, scaffold boards have imperfections. Reclaimed boards may have knots, cracks, dents, and even paint marks from previous use. While many people value this rustic look, it may not suit everyone. If you prefer a cleaner appearance, you can buy new untreated scaffold boards, though they will lack some of the character of reclaimed timber. Either way, you should expect some variation and irregularity, as that is part of their charm.

Cutting the Boards to Size

If you want to cut scaffold boards yourself, a circular saw will do the job, but a track saw or mitre saw will give the cleanest and straightest results. Always measure carefully and mark your lines before cutting. Safety is crucial: scaffold boards are chunky, so use clamps to secure them, wear goggles and hearing protection, and use dust extraction if possible. Cutting softwood creates plenty of sawdust, and it’s best to keep your work area as clean as possible.

If you prefer not to cut and join boards yourself, many suppliers now offer scaffold board tops pre-cut to size. The advantages are less mess, no need for large saws, and perfectly square edges. The downside is cost: pre-cut boards are more expensive per square metre, but they save time and hassle.

Joining Scaffold Boards Together

To create a wide desktop, you need to join several boards edge to edge. The simplest method is to apply wood glue along the edges and clamp them tightly until dry. For extra strength and alignment, you can use dowels or wood biscuits inserted into slots along the edges. This requires a drill or biscuit joiner but makes the joint stronger and neater. If you don’t want to glue, you can fix battens across the underside to hold the boards together. This method is easier but may leave small gaps between boards, which some people find less attractive.

Preventing Cupping and Sagging

Scaffold boards, like any solid wood, expand and contract with changes in humidity. Over time, this can cause cupping, where the edges curl upward or downward. To counteract this, you can add bars running across the grain on the underside of the desk. These can be simple wooden strips screwed into place, or more sophisticated metal bars routed into the wood. Metal is stronger but also more expensive and requires specialist tools. For longer desks, over 150cm, adding a lengthwise batten or spine underneath helps prevent sagging in the middle.

Positioning the Hairpin Legs

When attaching the legs, position them around 5–8cm in from the corners. This ensures good stability while maintaining a balanced look. If your desk is going against a wall, check that the legs don’t clash with skirting boards. It’s also a good idea to sit at the desk and check legroom before finalising their position, as moving them too far inward can create awkward seating.

Sanding Scaffold Boards

Scaffold boards can be rough, especially if reclaimed. Sanding is essential to create a smooth and pleasant work surface. An electric sander makes the process faster, starting with a coarse grit to remove dirt and roughness, then working up to a finer grit for a polished feel. Always sand with the grain where possible. If you don’t own a sander, you can sand by hand, though it will take more time. Some people even enjoy the process, finding it therapeutic and more connected to the material.

Pilot Holes and Edge Profiles

Before screwing the legs into the underside, always drill pilot holes. This prevents the wood from splitting and makes it easier to insert screws cleanly. You can also refine the edges of your desktop. A router allows you to create a rounded or chamfered edge, while simply easing the corners by hand with sandpaper makes the desk more comfortable to use. The choice depends on whether you want a rustic, straightforward look or a more polished finish.

Finishing the Desk Top

Finishing is vital to protect scaffold boards and bring out their beauty. Hardwax oil is a favourite because it is easy to apply, enhances the grain, and provides a durable, matte finish. Other oils like Danish or tung oil add warmth but may need refreshing over time. Varnishes and polyurethanes create a tougher protective layer against spills and scratches, though they can sometimes look shiny. For the best results, apply multiple thin coats and lightly sand between applications.

Conclusion

A desk built from hairpin legs and scaffold boards is a project that combines rustic character with modern elegance. The robust, weathered boards give the piece history and charm, while the slim steel legs keep it contemporary and balanced. With careful cutting, joining, sanding, and finishing, you can create a desk that is not only functional but also a statement piece in your home.

This style of desk is perfect if you want something affordable, sustainable, and full of character. Whether you prefer the rough authenticity of reclaimed boards or the cleaner look of new timber, scaffold boards and hairpin legs offer endless potential. The result is a sturdy, stylish, and unique workspace that you’ll enjoy for years to come.

Posted on

How to Build a Desk with Hairpin Legs and an Oak Veneer Top

Making a desk is one of the most satisfying DIY projects you can take on, and with the right materials, it can be affordable, stylish, and durable. While solid oak is beautiful, it is also heavy and expensive, which is why many people look to oak veneer as an alternative. Pairing a veneered oak top with hairpin legs creates a desk that looks sleek, modern, and high-end without the challenges of working with a solid hardwood slab.

The Style of the Desk and Where It Belongs

A desk made with hairpin legs and an oak veneer top has a light, contemporary style. The slim steel legs keep the structure minimal, while the oak veneer surface provides the warmth and natural grain of oak at a fraction of the weight and cost. This kind of desk looks right at home in modern apartments, creative studios, minimalist home offices, and spaces inspired by Scandinavian design. The look is understated and versatile, allowing the desk to blend seamlessly with existing furniture.

What Hairpin Legs Are and Why They Suit Veneer

Hairpin legs are crafted from bent steel rods welded onto a small mounting plate. Their name comes from their resemblance to a bent hairpin, and their enduring popularity since the 1940s is testament to their versatility. They are slim, unobtrusive, and available in a variety of finishes, which makes them the perfect complement to an oak veneer top. The steel provides the necessary strength while allowing the wood surface to be the main visual feature. For veneered furniture, hairpin legs are particularly suitable because they avoid the bulkiness that would clash with the clean, streamlined surface of veneer.

Why Oak Veneer Combines Well with Hairpin Legs

Oak veneer gives the appearance of solid oak without the same mass or cost. It’s usually a thin layer of real oak bonded onto a stable substrate such as MDF or particleboard. The result is a panel that looks like oak but is lighter, easier to handle, and less prone to warping. Because hairpin legs already have a delicate, minimal look, combining them with veneer creates a balanced desk that feels elegant but not overpowering. The steel carries the weight of the top easily, while the veneer delivers the character of oak without demanding heavy construction techniques.

Choosing the Right Colour for the Legs

Hairpin legs are typically sold in black, white, or natural steel. Black provides a classic, versatile look that works with almost any style. White feels bright and airy, especially in Scandinavian-inspired interiors. Natural steel looks raw and industrial, but it usually requires sealing to prevent rust. For a bespoke look, you can paint the legs yourself. Lightly sand the steel to help the paint adhere, then use either a brush or spray paint. Spraying gives the most even finish, while brushing allows for indoor touch-ups. Adding a clear topcoat will help protect the paint from scratches.

Why Oak Veneer Is Different from Solid Oak and Laminates

Oak veneer sits in the middle ground between solid hardwood and cheaper laminates. Unlike laminate, which uses printed patterns to imitate wood, veneer is made from a thin slice of real oak, so the surface has genuine grain and texture. Unlike solid oak, it is bonded to a core board such as MDF, which makes it stable and less prone to seasonal movement. This stability means you don’t need to worry about cupping or expansion as much as you do with solid oak. Veneer cannot be sanded and refinished as often as solid wood because the top layer is thin, but with careful handling, it can last for many years.

Choosing Thickness for a Veneered Desk Top

The thickness of veneered boards depends on the core material available from suppliers. Common thicknesses include 18mm, 22mm, or 25mm. The thicker the board, the less prone it will be to sagging, and the more substantial the desk will look. Eighteen millimetres is usually enough for a small desk, while 22–25mm is recommended for longer spans or heavier use. Since veneer is lighter than solid oak, you can afford to go a little thicker without making the desk too heavy to handle.

The Realities of Using Veneer

Although oak veneer looks like solid oak, it has some limitations. Because the surface layer is thin, you need to be careful when sanding to avoid going through to the core material. Veneered boards can also sometimes show small defects or patches where the veneer has been joined. These are usually subtle and less noticeable once the desk is finished, but it’s worth being aware that veneer does not have the same depth or variability as solid wood. On the positive side, it offers the beauty of oak grain in a cost-effective and environmentally efficient way.

Cutting Veneered Boards to Size

If you are cutting the veneered board yourself, use a circular saw with a fine-tooth blade, or ideally a track saw for perfectly straight lines. Veneer is prone to chipping, so it helps to score the cut line with a sharp knife first and to use masking tape along the cut to support the fibres. Work slowly and carefully, and always use protective gear like goggles and a dust mask. If you want to avoid the risk of chipping altogether, consider ordering pre-cut panels online. This ensures crisp, square edges, reduces mess, and saves time. The cost per square metre is slightly higher, but the convenience and professional finish often make it worthwhile.

Reinforcing Longer Desks

For desks longer than about 150cm, adding a lengthwise batten or “spine” underneath can help prevent sagging. While veneered boards are more stable than solid wood, they can still flex under load. A simple wooden batten screwed into the underside of the desk provides extra stiffness and peace of mind.

Positioning the Hairpin Legs

When attaching the legs, position them about 5–8cm in from the edges of the desk top. This ensures stability while giving the desk a balanced appearance. If your desk will sit against a wall, check that the legs don’t hit the skirting boards. It’s also worth doing a quick test fit with a chair to make sure the leg placement doesn’t interfere with comfortable seating.

Sanding Veneer

Because oak veneer is thin, sanding needs to be done gently. Start with fine-grit sandpaper such as 180 and avoid heavy pressure. An orbital sander can be used, but only with care—lingering too long in one spot risks sanding through the veneer. Many people prefer to sand veneer by hand, which is slower but much safer. The goal is to smooth the surface and prepare it for finishing, not to remove material.

Pilot Holes and Edge Profiles

Before attaching the legs, drill pilot holes to prevent the substrate beneath the veneer from splitting. This makes it easier to drive screws in cleanly and accurately. For the edges, most veneered boards will already have a clean finish, but you can soften them slightly by sanding or by applying an iron-on edge banding to cover exposed core material. Rounded or chamfered profiles are possible, but they need to be done with care since the veneer layer is thin.

Finishing an Oak Veneer Desk Top

Finishing an oak veneer desk protects it from spills and wear while bringing out the natural grain. Hardwax oil is an excellent choice, giving a durable, matte finish that enhances the oak’s warmth. Other oils such as Danish or tung oil also work well but may need reapplying periodically. Varnishes and polyurethanes provide a tougher, more protective coat, though they can look shinier. Whichever finish you choose, apply thin, even coats with a cloth, brush, or roller, and lightly sand between coats to achieve a smooth result.

Conclusion

Building a desk with hairpin legs and an oak veneer top is a project that strikes a balance between style, practicality, and affordability. Hairpin legs give the desk a light and modern profile, while the veneer offers the natural beauty of oak without the weight or expense of solid timber. By choosing the right thickness, cutting carefully or ordering pre-cut, reinforcing longer spans, sanding gently, and finishing thoughtfully, you can create a desk that looks professional and serves you well for years.

This approach is ideal if you want the appearance of oak but don’t want the challenges of working with a heavy hardwood slab. With a little care, you’ll end up with a desk that combines strength, beauty, and practicality in equal measure—a perfect addition to any home office or creative workspace.

Posted on

How to Build a Desk with Hairpin Legs and a Solid Oak Top

Making your own desk is one of those projects that combines practicality with creativity. You end up with a piece of furniture that is tailored to your space, feels satisfying to use every day, and shows off materials that look better than anything mass-produced. A popular choice for a modern DIY desk is to use hairpin legs with a solid oak top. This combination balances elegance with strength, creating a timeless piece that works in almost any home or office setting.

The Style of the Desk and Where It Belongs

A desk made with hairpin legs and a solid oak top has a distinctive style that feels both contemporary and classic. The slimness of the steel legs contrasts with the natural depth and warmth of the oak. This creates a look that feels minimal but not cold, robust but not clunky. In terms of interiors, it suits a wide range: Scandinavian-inspired spaces with their preference for pale woods and simplicity, industrial-style apartments where metal features prominently, mid-century homes that nod to the era when hairpin legs were first invented, and modern family homes where a versatile desk needs to slot into a living room, bedroom, or dedicated office space without looking out of place.

What Hairpin Legs Are and Why They Work

Hairpin legs are made from steel rod that is bent into a U-shape and welded onto a mounting plate. Most designs use two rods, while some heavier-duty versions use three. The name comes from their resemblance to a bent hairpin, and despite their minimal form, they are strong enough to support heavy tops when properly attached. Their look is slim, unobtrusive, and a little industrial, which makes them a natural pairing for a wooden surface. They allow the wood itself to be the star of the show while providing the necessary strength and stability.

Why Hairpin Legs Combine Well with Solid Oak

Solid oak is one of the heaviest and most characterful timbers used in furniture making. Pairing it with bulky legs would risk making the desk feel too heavy and imposing. Hairpin legs are the perfect match because they balance out oak’s mass with lightness and simplicity. The contrast between industrial steel and natural wood is striking, while the strength of both materials ensures the desk is not only stylish but also durable. It’s a combination that brings warmth to modern interiors and refinement to more industrial settings.

Choosing the Right Colour for the Legs

Hairpin legs are typically available in black, white, or raw steel. Black is a safe choice that gives the desk a timeless and versatile look, while white feels lighter and works well in clean, modern, or Scandinavian spaces. Raw steel has an industrial appeal but usually requires sealing to prevent rust. If none of these quite fit, you can paint them yourself for a bespoke look. To do this properly, sand the steel lightly first so the paint adheres, then either brush or spray your chosen colour. Spraying generally produces the most even finish, while brushing allows for control in smaller indoor spaces. A clear protective topcoat can be added to extend the life of the paint.

Why Solid Oak Is Different from Cheaper Alternatives

Solid oak is a natural hardwood and has been used in furniture for centuries because of its durability, strength, and distinctive grain. Unlike laminated or veneered products, which have a thin decorative layer over a cheaper substrate, solid oak is consistent throughout. This means it can be sanded, refinished, and repaired over time, giving it a lifespan of decades rather than years. Laminates are cheaper but don’t have the same warmth, and once damaged, they can’t be restored. Veneered panels can look convincing at first but will quickly show their limitations if subjected to wear and tear. Solid oak, on the other hand, is an investment in both beauty and longevity.

Choosing the Thickness of the Oak

The thickness of the oak top plays a big role in both the appearance and the performance of the desk. Timber suppliers typically offer solid oak boards in 19mm, 24mm, 27mm, 30mm, and 40mm. The thicker the oak, the less prone it will be to sagging, and the more substantial it will feel. Nineteen millimetres looks sleek and is lighter to handle but may need reinforcement on longer spans. Twenty-four millimetres is often the best compromise between price, weight, and durability. Anything above thirty millimetres starts to feel very chunky, with forty millimetres being a bold statement but also extremely heavy. The choice depends on your aesthetic preference and how much strength you need for your setup.

The Realities of Using Oak

As a natural material, oak comes with certain features that you need to embrace. Knots are common and can either add character or be seen as imperfections, depending on your taste. Medullary rays, which appear as light streaks across the grain, are another distinctive feature of oak. Some suppliers offer “prime oak,” which has fewer knots and a more uniform appearance, while character oak embraces all of nature’s quirks. Either way, the wood will have variations, and that is part of its appeal.

Cutting the Oak to Size

If you are confident with tools, you can cut your oak top to size at home. A circular saw fitted with a fine-tooth blade will do the job, though a track saw will give the straightest and cleanest results. Always measure carefully, mark clearly, and cut slowly. Safety is essential when working with hardwood: use goggles, hearing protection, and a dust mask, and ideally hook your saw up to dust extraction, as oak produces a lot of fine dust.

If you don’t have the tools or the confidence, you can order oak tops already cut to size from many online suppliers. This saves the hassle of cutting, reduces wastage, and ensures square edges. It costs more per square metre, but for many people, the convenience and accuracy make it worthwhile.

Preventing Cupping and Sagging

One of the challenges with solid wood is that it moves with changes in humidity. Over time, oak can cup, meaning the edges curve upward or downward. To prevent this, you can add bars running across the grain on the underside of the desk. These can be made from wood and screwed in place, or from metal for a more engineered solution. The key is not to glue them, as the oak still needs to expand and contract naturally. For desks longer than around 150cm, it can also be helpful to add a lengthwise batten or “spine” underneath to prevent sagging in the middle.

Positioning the Hairpin Legs

When it comes to attaching the legs, position them about 5–8cm in from the corners. This creates a balanced look and ensures the desk feels stable. If the desk will be placed against a wall, make sure the legs don’t collide with skirting boards. Also think about legroom: placing the legs too far inward may interfere with a chair or knees. A quick mock-up with the legs held in place before drilling is always worthwhile.

Sanding the Oak

Sanding oak is straightforward but should be done carefully. An electric sander speeds up the process, starting with medium-grit sandpaper and working up to fine. Always sand with the grain to avoid scratches. If you prefer a more traditional approach, sanding by hand is perfectly valid and can be a meditative process, though it takes longer. The goal is to achieve a smooth, even surface ready for finishing.

Pilot Holes and Edge Profiles

Before screwing the legs into place, drill pilot holes. This prevents the oak from splitting and makes it easier to drive the screws cleanly. For a refined edge, you have the option of using a router to create a chamfer, round-over, or bevel, or simply easing the edges by hand with sandpaper. Even a slight rounding makes the desk more comfortable to use and gives it a finished appearance.

Finishing the Oak Top

A finish is essential for protecting the oak and enhancing its natural beauty. Hardwax oil is a popular choice because it is easy to apply, brings out the grain, and leaves a natural matte finish. Other oils such as Danish or tung oil penetrate deeply and give the wood a warm, rich tone, though they may need reapplying from time to time. Varnishes and polyurethanes create a tougher surface layer that resists spills and scratches but can sometimes look overly glossy. For the best result, apply several thin coats, sanding lightly between each one.

Conclusion

A desk built with hairpin legs and a solid oak top combines the best of both worlds: the strength and timeless character of oak with the elegance and lightness of steel. The result is a piece of furniture that is sturdy, stylish, and versatile. By carefully choosing the thickness of the oak, cutting accurately or ordering pre-cut, reinforcing against movement, sanding smoothly, and finishing thoughtfully, you can create a desk that looks professional and will last for many years.

This type of desk is not only practical but also a pleasure to look at and use. Whether you want it for a home office, a studio, or simply a stylish workspace in your living room, the combination of hairpin legs and solid oak offers a balance of tradition and modernity that few other designs can match.

Posted on

How to Build a Desk with Steel Box Section Legs and a Birch Plywood Top

Building your own desk is one of the most rewarding DIY projects you can take on. Not only do you end up with a piece of furniture that perfectly fits your space, but you also gain the satisfaction of creating something with your own hands. One of the strongest, most modern options for a DIY desk pairs steel box section legs with a birch plywood top. This combination balances industrial sturdiness with natural warmth, giving you a desk that looks professional and lasts for years.

The Style of the Desk and Where It Fits

A desk made with steel box section legs and a birch plywood top has a bold, modern look that works beautifully in a wide range of interiors. The clean lines of the legs lend an industrial feel, while the plywood top keeps the design approachable and warm. This type of desk is perfect for contemporary apartments with exposed materials, loft-style homes, and minimalist spaces where function and form are equally important. It also works in home offices where you want a serious, sturdy desk without going overboard on traditional heaviness.

Unlike more delicate designs, this desk has a substantial presence. The steel gives it a visual weight that grounds the space, while the birch plywood surface keeps it versatile enough to fit with other furniture styles.

What Box Section Steel Legs Are and How They Look

Box section legs are made from rectangular or square hollow steel tubing that is welded into a frame. The hollow construction keeps them strong yet lighter than solid metal, and the squared profile gives them a geometric, architectural look. They can be manufactured in simple rectangular frames, trapezoid shapes, or even with angled details for extra flair.

The result is a leg design that feels more solid than hairpin legs but less bulky than timber supports. Their look is unmistakably modern: sharp edges, flat planes, and a sense of durability that makes them popular in both office and home settings.

Why Box Section Legs Combine Well with Birch Plywood

Pairing steel box section legs with birch plywood works on both a practical and aesthetic level. Steel provides the strength to support heavy loads without flexing, while birch plywood offers a warm, natural surface that balances the industrial feel of metal. Together they create a desk that is modern, functional, and stylish without feeling cold.

The contrast between the sleek powder-coated steel and the pale, patterned edges of the plywood makes the desk a striking focal point. It’s a combination that looks equally at home in a minimalist home office, a co-working studio, or even a creative workshop.

Choosing the Right Colour for Steel Box Section Legs

Box section legs are commonly sold in three finishes: black, white, and natural steel. Black is the most versatile and works well in almost any room, offering a bold, timeless look. White feels cleaner and lighter, blending into bright modern spaces or Scandinavian-style interiors. Natural steel has a raw, industrial appeal, though it will need sealing to prevent rust.

If you want something unique, you can paint the legs yourself in a bespoke colour. Before painting, the legs should be sanded lightly to give the paint a surface to grip. You can then apply paint using a brush, roller, or spray can. Spraying usually gives the most even finish, while a brush offers more control if you are working indoors. Adding a clear topcoat or varnish afterward will increase durability.

Birch Plywood vs. Cheaper Plywood

The top of your desk deserves just as much attention as the legs, and this is where birch plywood shines. Birch ply is a hardwood plywood made from multiple thin veneers of birch layered and glued together. It has a dense structure, a fine grain, and a smooth surface that makes it perfect for furniture.

By contrast, cheaper softwood plywoods made from pine or spruce are usually designed for construction. They often contain voids, knots, and rough surfaces, and are more prone to warping. Birch plywood not only looks better but also resists flexing and maintains its shape over time, making it the superior choice for a desk top.

Why Birch Plywood Is So Popular in Furniture Making

In recent years birch plywood has become a favourite among designers and DIYers. Its layered edge has become almost iconic, often left exposed as part of the finished look. Its clean, pale surface suits the Scandinavian and Japanese-inspired styles that dominate modern interiors, while its strength and affordability make it a practical choice. It is also more sustainable than solid hardwoods, as the veneers maximize the usable wood from each log.

Choosing Between 18mm and 24mm Thickness

When deciding on plywood thickness, consider how you’ll use the desk. An 18mm top looks sleek and modern while being lighter and more affordable. It works well for smaller desks or lighter loads. However, if the desk will span more than 150cm or carry heavy equipment, 24mm plywood is the better choice. It is stiffer, less prone to sagging, and gives the desk a more substantial appearance. The extra thickness often feels more premium, even though it still retains a contemporary profile.

The Realities of Using Plywood

Plywood, even high-quality birch, comes with some quirks. You may see small circular or oval patches where knots have been replaced during manufacturing. Scratches, colour variations, or other imperfections are also common. These don’t detract from its strength and can even add character, but it’s worth knowing in advance so you’re not surprised when you unwrap your sheet.

Cutting the Plywood to Size

If you plan to cut your plywood yourself, use a circular saw with a fine-tooth blade. A track saw will give the most accurate and clean results. Take your time with measurements and markings, and always think about safety: wear protective goggles, hearing protection, and a dust mask, and ideally connect your saw to a dust extractor to minimise airborne particles.

Another option is to order your desktop pre-cut from a supplier. This guarantees perfectly square edges, reduces waste, and saves a lot of mess. While cut-to-size services are usually more expensive per square metre, they are often worth it if you don’t own good-quality cutting tools.

Reinforcing Longer Desks

If your desk is longer than about 150cm, it’s a good idea to reinforce the underside with a batten or “spine.” This extra support reduces sagging over time, particularly if you’ve chosen the thinner 18mm plywood. A single piece of timber running lengthwise down the middle is usually enough to add stiffness.

Positioning the Legs

Leg placement is another detail to get right. Positioning the box section frames about 5–8cm from each end works well for stability and balance. If the desk will sit against a wall, check that the legs don’t interfere with skirting boards. You’ll also want to ensure they don’t reduce legroom, particularly if you’re planning to use the desk with a mobile chair.

Sanding the Plywood

Before finishing, the plywood should be sanded. Start with 120-grit paper and work up to 180 or 240 for a smooth finish. Be careful not to sand too aggressively with a power sander, as the thin top veneer can be worn through, exposing the glue layers beneath. For edges and corners, sanding by hand is often safest and gives the most control.

Pilot Holes and Edge Profiles

When it comes time to attach the legs, always drill pilot holes. Screwing directly into plywood without them risks splitting and can make it harder to secure the screws properly. Use screws that are short enough not to come through the top.

For an extra professional touch, you can shape the plywood edges. A router lets you create a chamfered or rounded profile, but you can also achieve a subtle softened edge by sanding. Exposed ply edges are part of the design appeal, so there’s no need to cover them up.

Finishing the Top

The final step is finishing. This not only protects the plywood but also enhances its beauty. Hardwax oil is a popular choice because it’s easy to apply, enhances the grain, and leaves a natural matte finish. Other oils such as Danish or tung oil soak in and give warmth but may need refreshing occasionally. Varnishes and polyurethanes form a tougher barrier, offering maximum durability, though they can sometimes look glossy. Applying several thin coats and sanding lightly between them will give the smoothest, most resilient result.

Conclusion

A desk built with steel box section legs and a birch plywood top is a project that combines strength, modern style, and timeless practicality. The steel provides solidity and a sharp architectural look, while the birch plywood brings warmth and versatility. By choosing the right thickness of plywood, cutting carefully (or ordering pre-cut), sanding gently, and finishing thoughtfully, you can create a desk that feels professional and lasts for years.

Whether you want a substantial home office workstation, a minimalist study table, or a creative studio desk, this design is flexible enough to fit in. With its industrial-meets-natural balance, it’s a piece of furniture that looks as good as it performs—and one you’ll be proud to say you built yourself.